As an Amazon Associate I earn from qualifying purchases. This post may contain affiliate links.
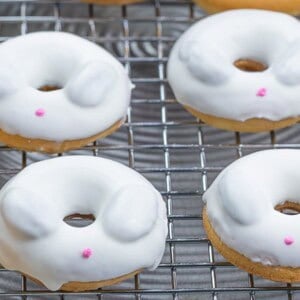
These Easter bunny donuts are an easy Easter dessert to make with kids! Bunny donuts made with almond ears and dipped in white candy melt are perfect for Easter parties!
These little Easter bunny donuts are too cute not to make! They’re perfect for decorating with kids and make for a fun family activity! They’re also embarrassingly easy to make since they’re made with…..boxed cake mix! That’s right! Save yourself the hassle and just get the boxed cake mix for these donuts.
Don’t get me wrong, I love making cake from scratch and definitely think they taste better. But for these mini donuts, I think it’s totally fine to use boxed cake mix because let’s be honest, if we’re going to make cake from scratch, we aren’t going to make them into little mini donuts, am I right? 😀
*This post may contain affiliate links which means any purchases made through my link pay out a small commission without any extra cost to you. All opinions are my own and I only recommend products that I know, personally use, and trust. For more information, please see my Privacy Policy.
How to Make Mini Easter Bunny Donuts
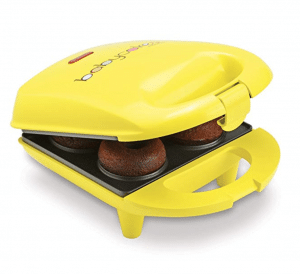
There’s so many ways to make donuts at home thanks to these BabyCakes Mini Donut Makers (pictured below), silicon donut molds, and nonstick donut molds.
I made these Easter bunny donuts using the BabyCakes Mini Donut Makers. I bought it over a year ago and it seriously cuts down on the time it takes to make them. No preheating the oven and clean up is fast and easy. It’s essentially like a waffle maker but in the shape of mini donuts. Silicon and nonstick donut molds would work too but I personally prefer this method since I can keep my eye on them and it’s pretty convenient.
Tips for Making Easter Bunny Donuts:
- If kids are involved, pre-make the donuts ahead of time so they’re ready to decorate. You can pour the batter into a piping bag or ziplock bag and snip the end to make it easier to fill.
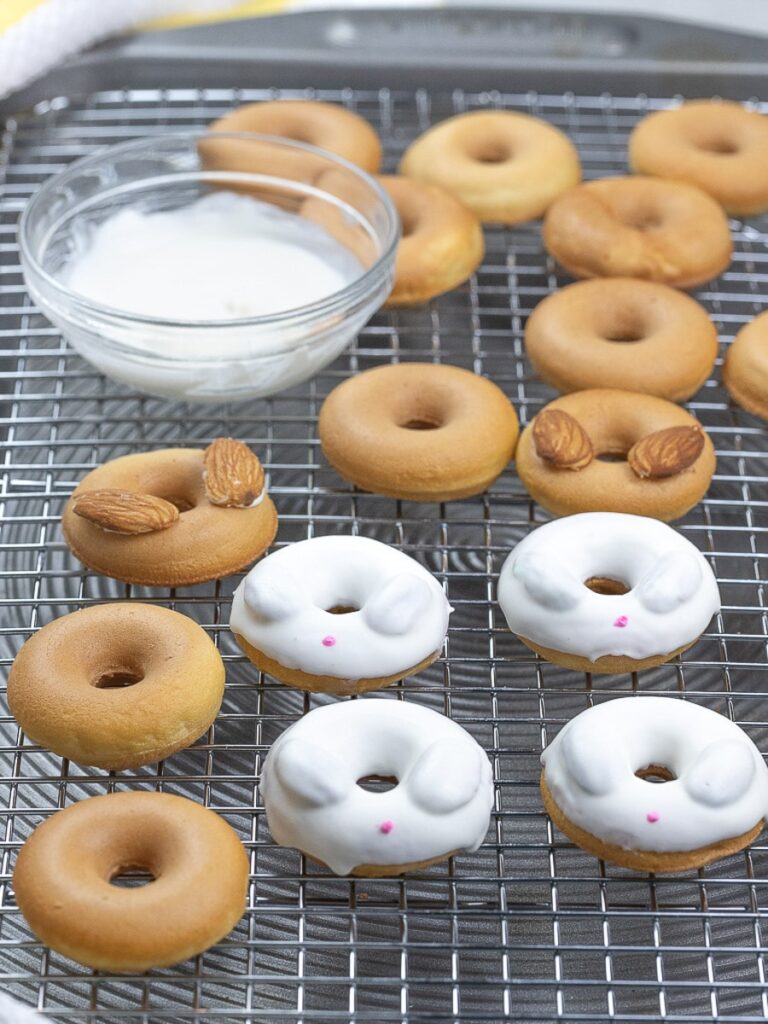
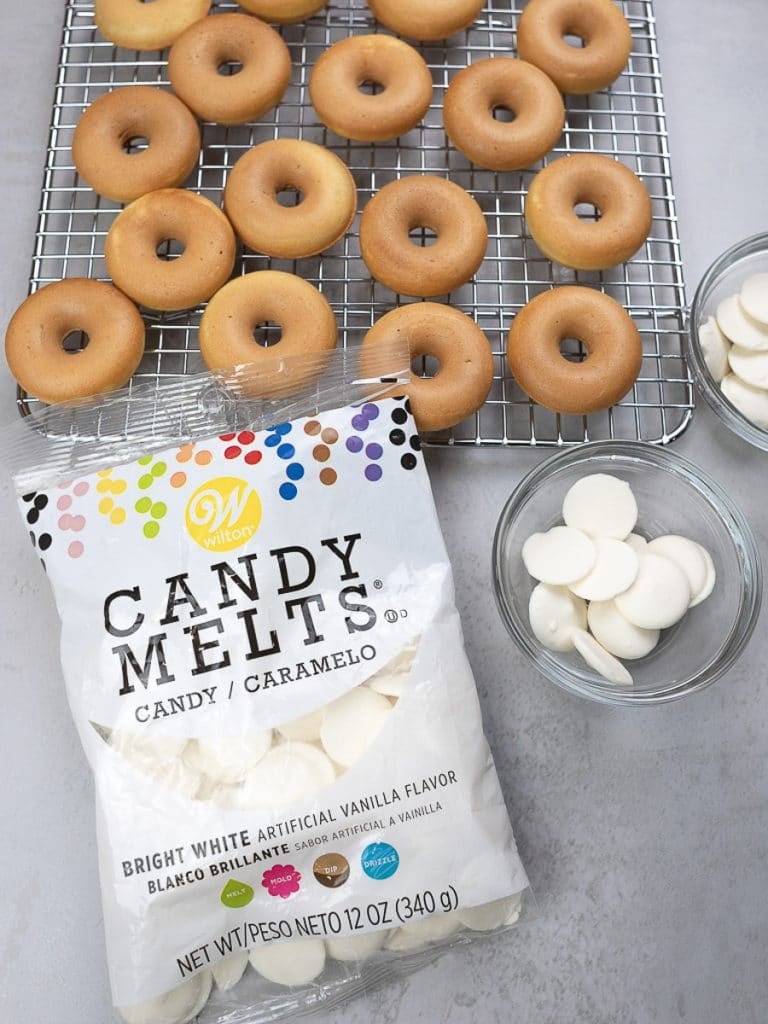
- I used Wilton Bright White Candy Melts for dipping. Be sure to follow the directions for melting.
- Donuts should be cooled before dipping to ensure an even coating.
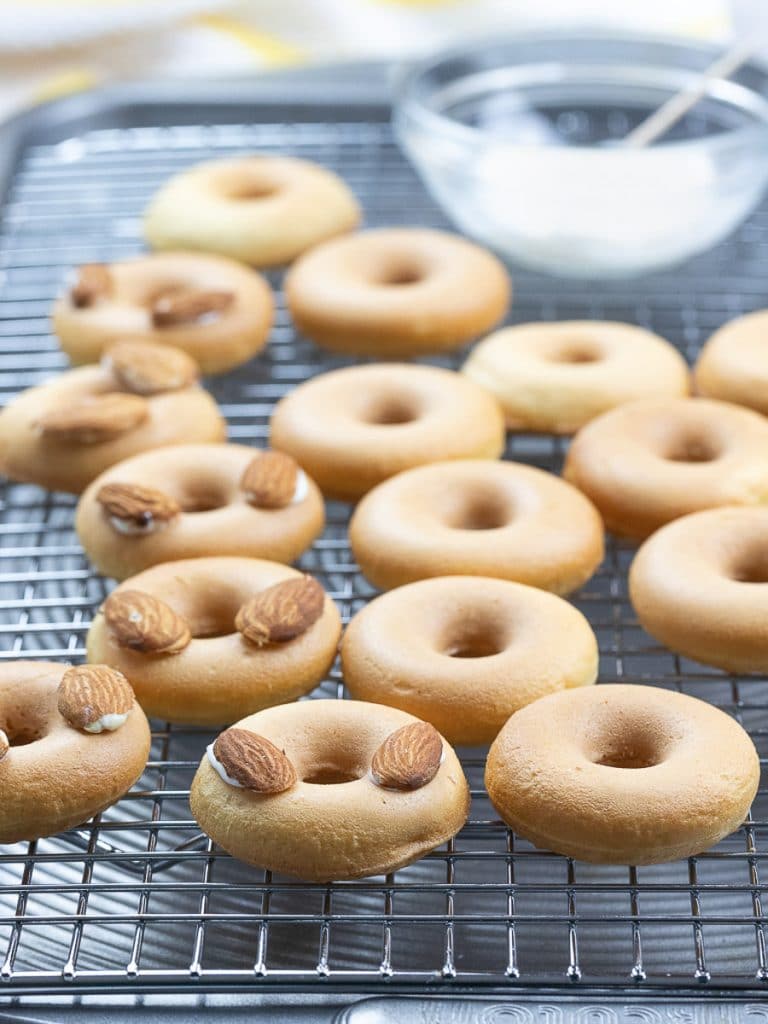
- Split the almonds in half to get a flat surface to easily stick to the donuts.
- Use some of the melting candy melts to adhere the halved almond pieces to the donuts to create bunny ears. They should harden quickly and be ready for dipping in about a minute.
- If you want to thin out your candy melt, warm up it up first in the microwave and then add in 1/4 teaspoon of vegetable shorting or Wilton EZ Thins at a time until you reach the desired consistency. If using shortening, avoid adding too much as this can affect the final texture of the candy coating.
- Keep your candy coating in a larger bowl with hot water to keep it from hardening up too soon.
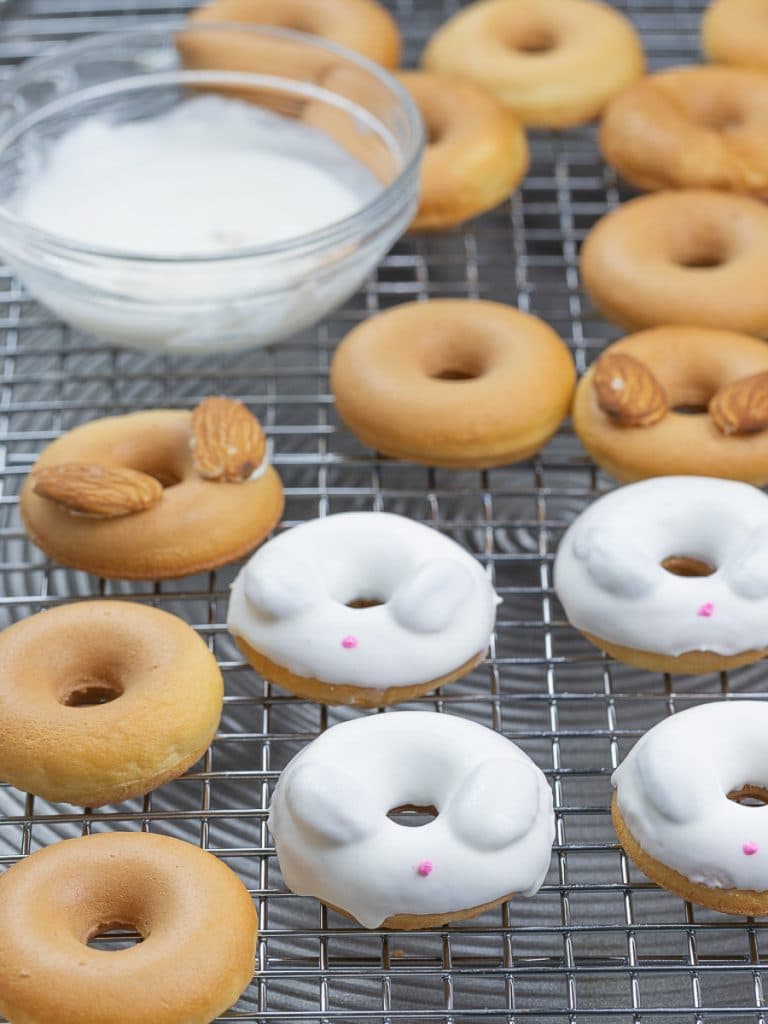
- Give the donuts a little shake to even out the candy coating for a smooth texture after dipping.
- Add a tiny amount of oil-based pink candy coloring to the white candy melt to create a little pink color. Do not use water-based food coloring as that will cause your white candy melt to seize up and turn hard. It only takes a little bit for that to happen. Trust me, I know this all too well and it’s super frustrating when that happens! Don’t make this mistake.
- Using a toothpick, create a dot for the bunny nose.

And there you have it! Cute and easy Easter bunny donuts that are fun to make and fun to eat. I hope you make this recipe! Please share, rate, and comment below. It means a lot to me and I’d love to hear from you!
Don’t forget to subscribe to my newsletter for recipe updates and occasional kitchen tips and tricks! Also come find me on Pinterest, Facebook, Instagram, and Twitter. Stop by and leave me a message! I love reading your comments!
Thanks so much for stopping by!
![]()
You might like these other recipes. Check them out!
*This post may contain affiliate links which means any purchases made through my link pay out a small commission without any extra cost to you. All opinions are my own and I only recommend products that I know, personally use, and trust. For more information, please see my Privacy Policy.
Easter Bunny Donuts
Ingredients
Donut Ingredients
- 1 package cake mix, any flavor
- 1 cup water
- ¼ cup oil
- 1 egg
- 1 cup almonds, for bunny ears, split in half length wise
Glaze Ingredients
- 1 package of Wilton Bright White Candy Melts
- Oil-based pink candy coloring
- ¼ teaspoon Wilton EZ Thins, optional to thin out candy melts
Instructions
Baking in the oven:
- Preheat the oven to 350 degrees F.
- Meanwhile, in a large bowl, mix together the cake mix, water, oil, and egg until combined. For convenience, transfer the batter to a pastry bag or zip lock bag for easier filling.
- Lightly grease your donut pan or mold. Fill your molds 3/4 of the way full and bake in the oven for 8 - 10 minutes. Allow them to cool on a cooling rack before decorating.
BabyCakes mini donut maker:
- Plug in your BabyCakes mini donut maker and lighter grease the molds with vegetable oil. Wait about 2 minutes for it to get hot.
- Meanwhile, in a large bowl, mix together the cake mix, water, oil, and egg until combined. For convenience, transfer the batter to a pastry bag or zip lock bag for easier filling.
- Add about 2 Tablespoons of batter into the molds. Be careful not to overfill as the batter expands. Close the lid and check for doneness after 3 - 4 minutes.
- Allow them to cool on a cooling rack before decorating.
Decorating:
- Follow the instructions for melting the Wilton Bright White Candy Melts. If desired, you can thin the consistency with a little bit vegetable shorting or Wilton EZ Thins but it's not necessary.
- Apply a small amount of the white candy melt to the almond halves and adhere them to the donut to create bunny ears. Wait about 1 minute for it to harden. Dip the donuts into the white candy melt and give it a little shake to settle the coating to create a smooth surface.
- In a small bowl, add a teaspoon of the white candy melt. Using a toothpick, add a little bit of the pink candy coloring until you reach the desired color for the bunny nose. Apply a small dot using a toothpick.
Notes
- Avoid water-based food coloring when coloring candy melts as that will cause your white candy melt to seize up and turn hard. It only takes a little bit for that to happen!
Nutrition
Nutrition information is automatically calculated, so should only be used as an approximation.
Like this? Leave a comment below!

My niece just celebrated her 7th birthday, and she is a huge bunny fan, so I made these donuts for her as her birthday cake. She LOVED them, and said to say thank you to the lovely lady with the beautiful blog 🙂
Thank you Bri! I’m so glad your niece enjoyed them, please tell her she’s welcome. 🙂
These are the cutest! I meant to comment earlier that I made these over Easter – we have made them several times since as they just taste so good. You’re so creative! 🙂 Can’t wait to try some of your other recipes. Em
Oh my goodness! They looks.so.cute+delicious ? and I have everything to make them.. definitely.making them.with my boys!
Awesome Sonia! I hope you and your boys had fun making them! Thanks for the kind words! 🙂
Such a fun project to make with the kids! I can’t wait to show mine! They will want to gobble them up!
Haha isn’t this fun? I hope you and your kids enjoyed making them!
These are absolutely brilliant! The little pink nose is perfect 🙂
Haha thanks Sue! The little pink nose was my favorite part hehe
Oh gosh, these are super cute and so much fun to make with kids. Love this idea!
Thanks so much Edyta! Yes kids love this so much! I hope you enjoyed them!