As an Amazon Associate I earn from qualifying purchases. This post may contain affiliate links.

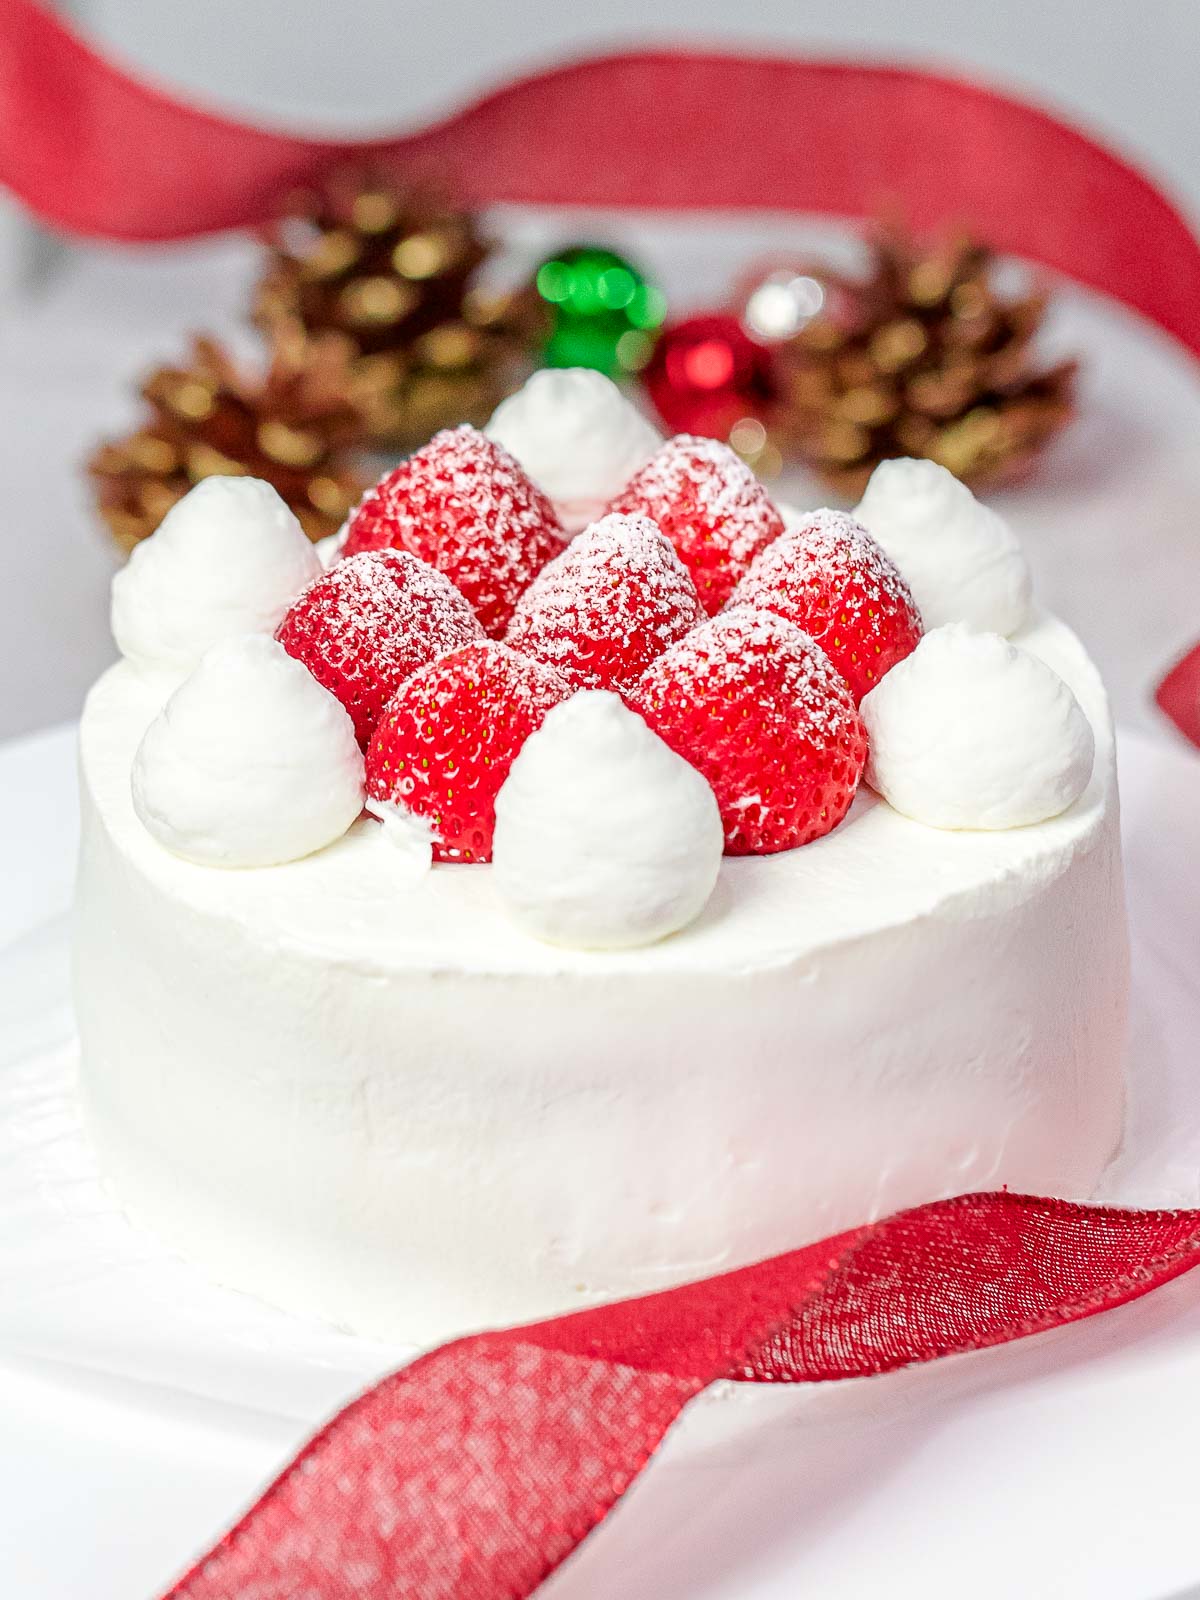
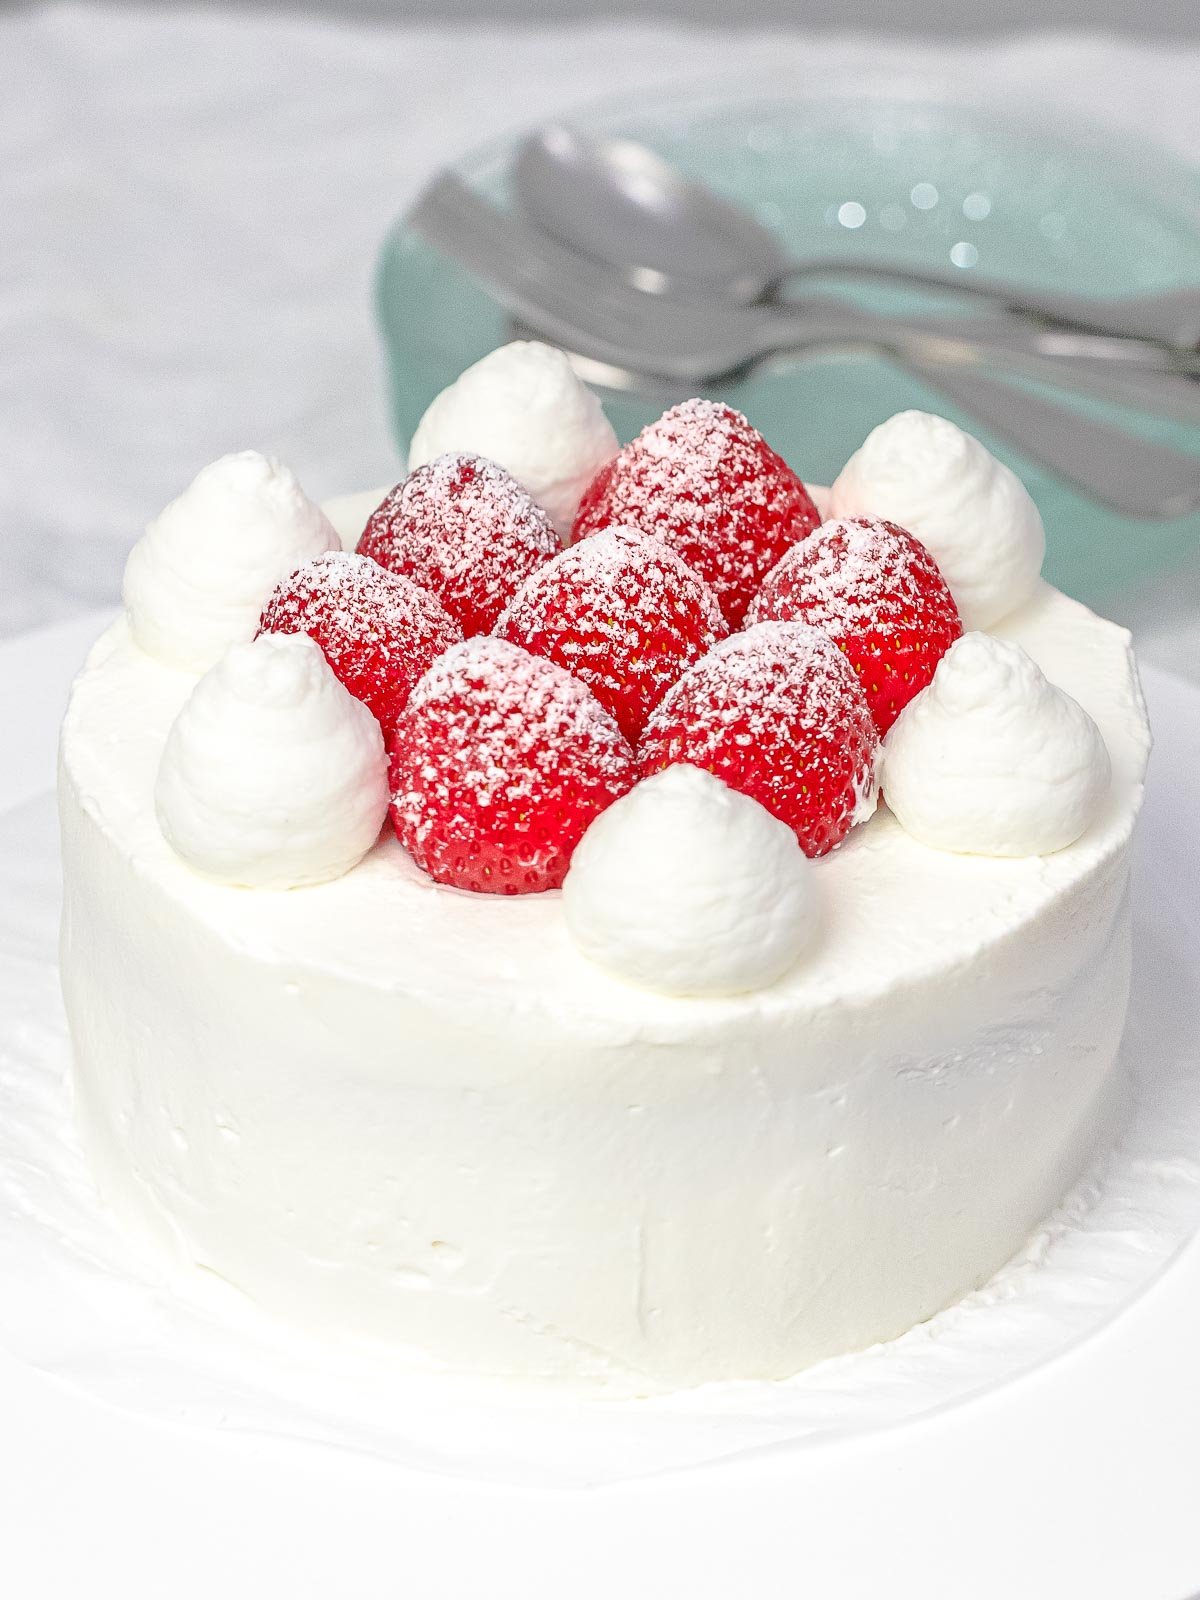
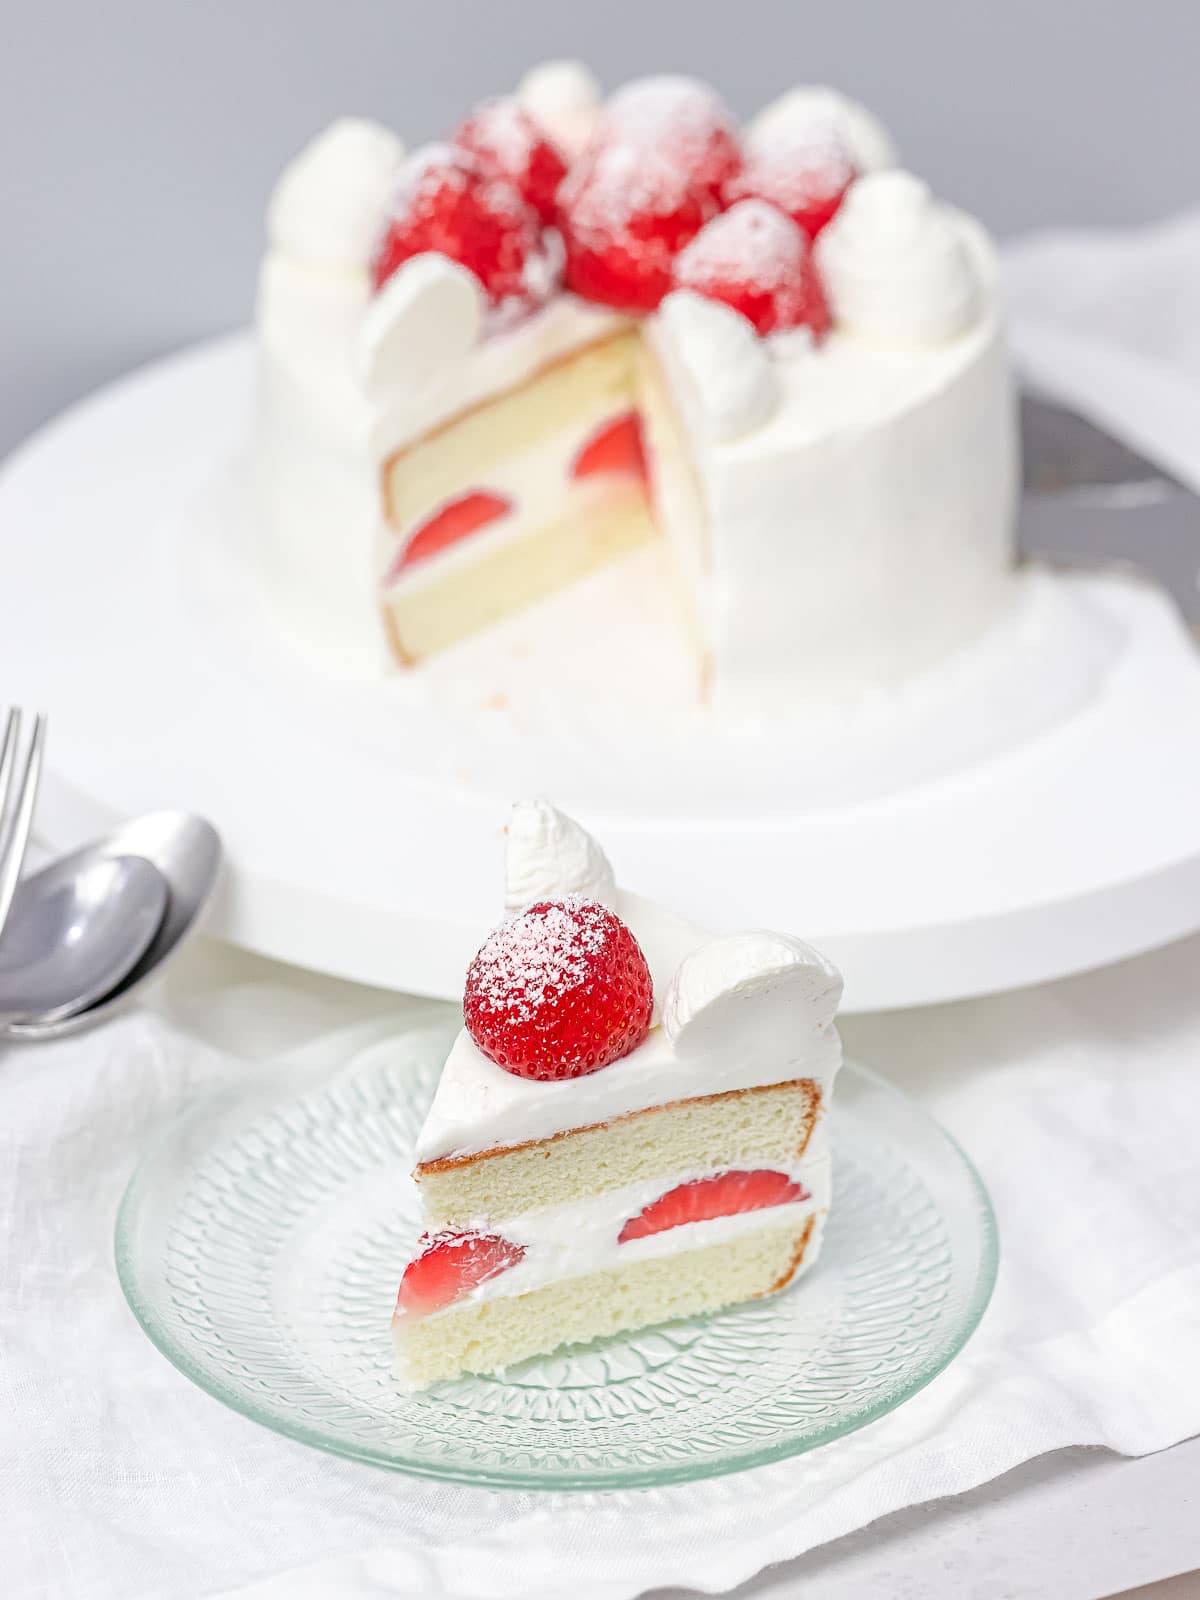
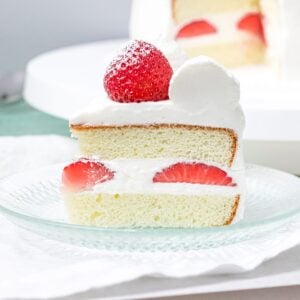
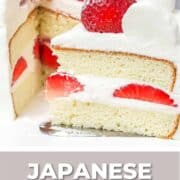
Japanese strawberry shortcake, aka Japanese Christmas cake, is made of soft, fluffy layers of sponge cake, fresh strawberries, and fresh whipped cream!
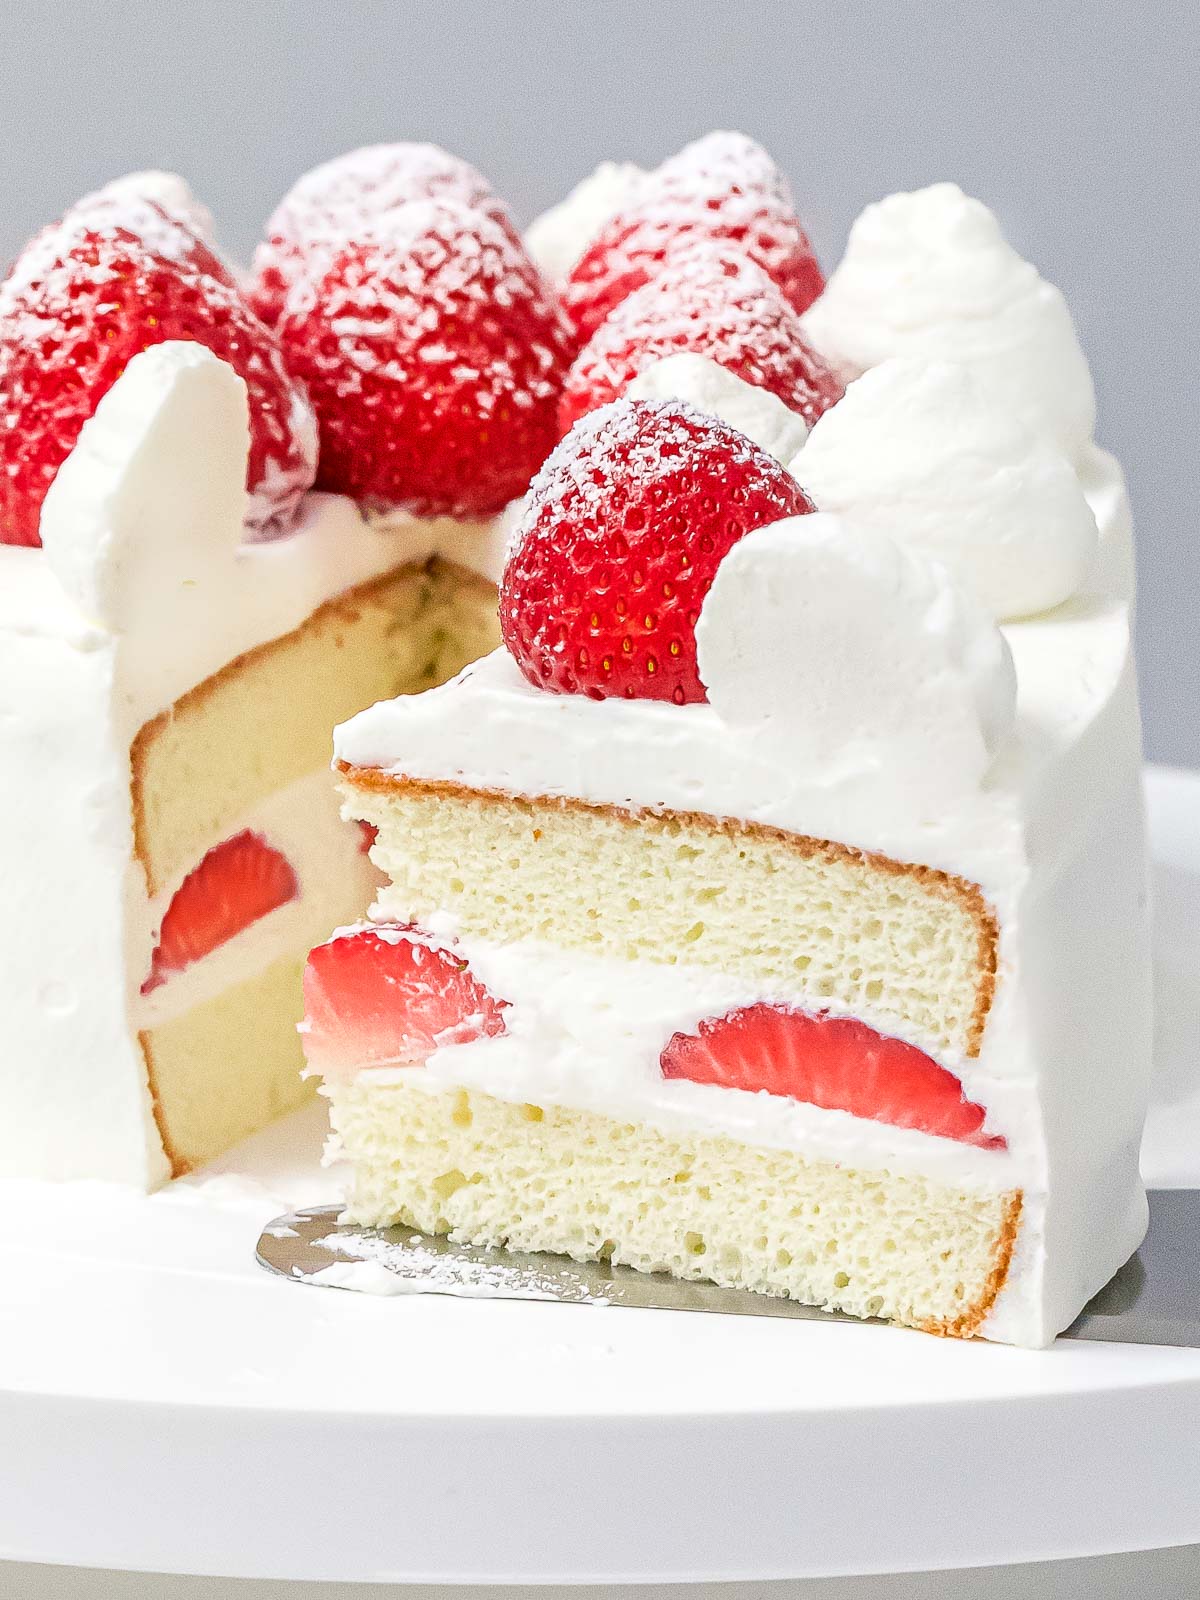
Japanese strawberry shortcake is a popular cake in Japan made with soft, fluffy sponge cake, decorated with fresh whipped cream, and fresh strawberries.
In fact this strawberry cream cake is popular in a lot of Asian countries and goes by many names, including Korean strawberry cake, fresh cream cake, and Chinese strawberry cake.
What they all have in common is the strawberry sponge cake is not overly sweet and is filled with fresh fruit. Asian sponge cakes are usually frosted with fresh whipped cream instead of buttercream.
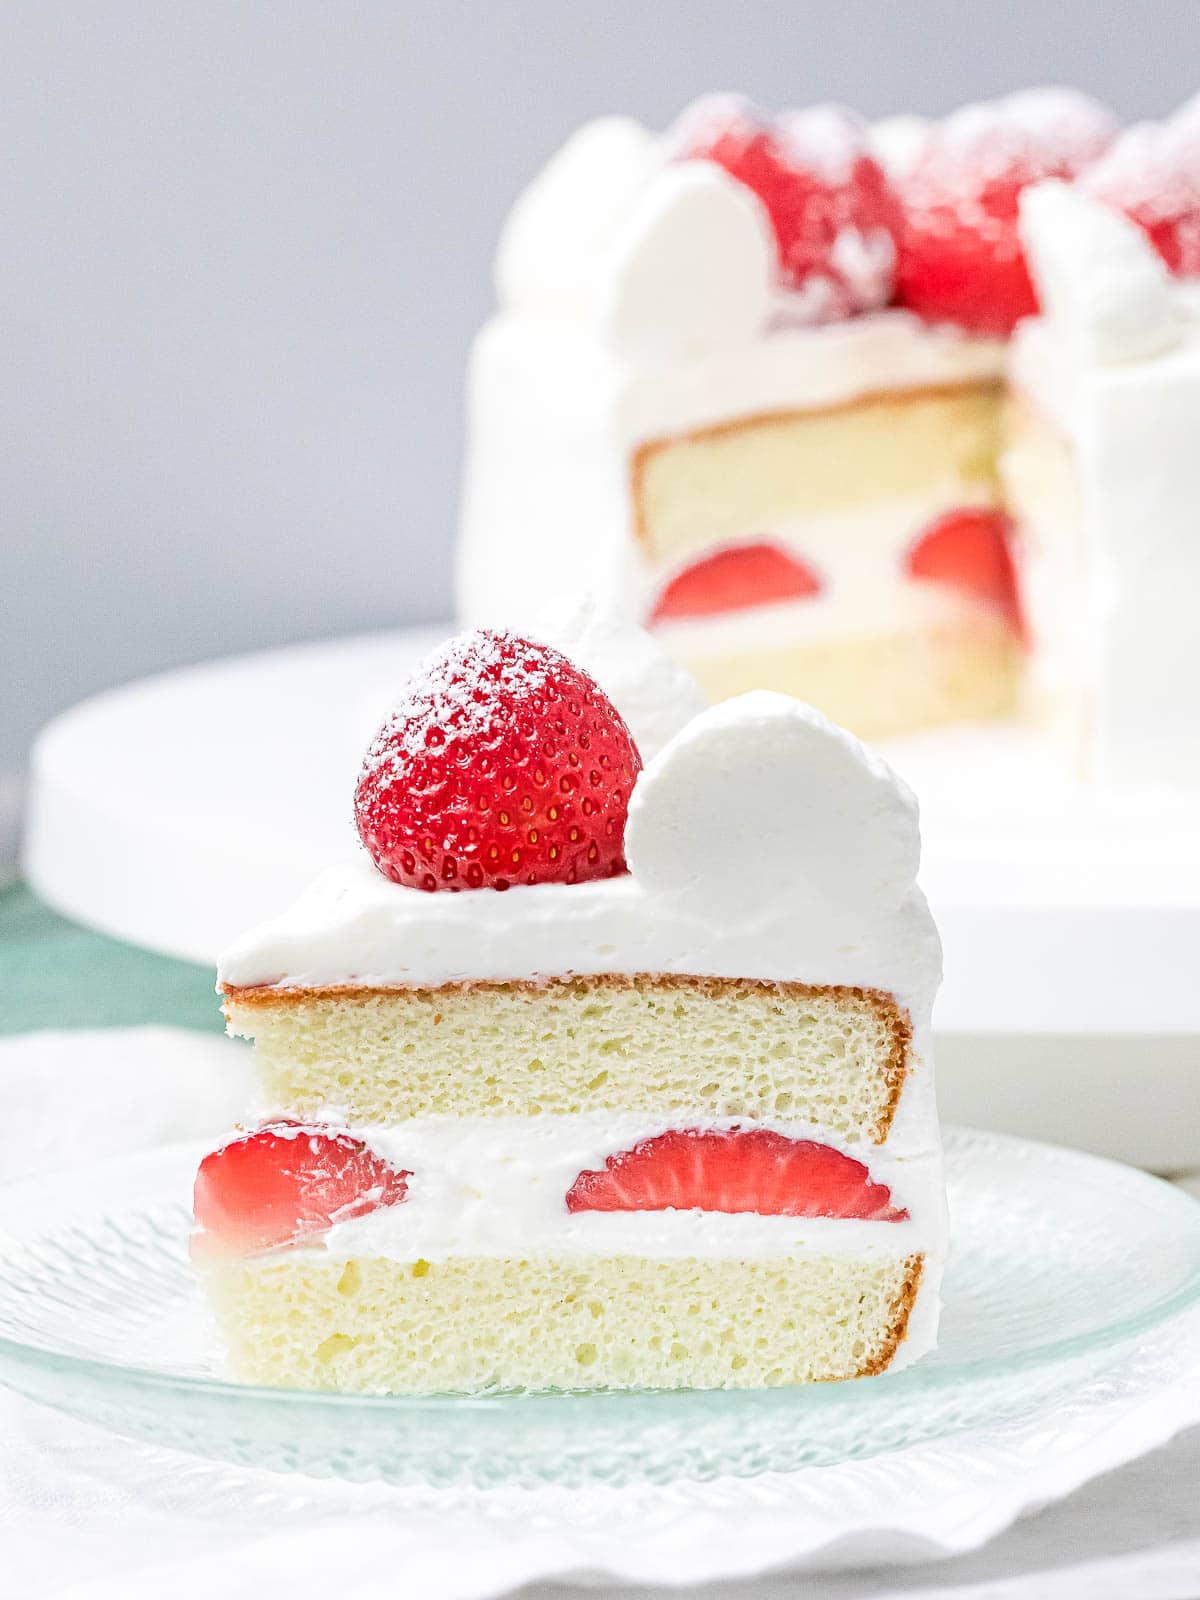
The texture of this fresh strawberry sponge cake is pillowy soft from the cake flour, and extremely fluffy from the beaten egg whites and egg yolks. It’s layered with fresh slices of strawberries and soft whipped cream.
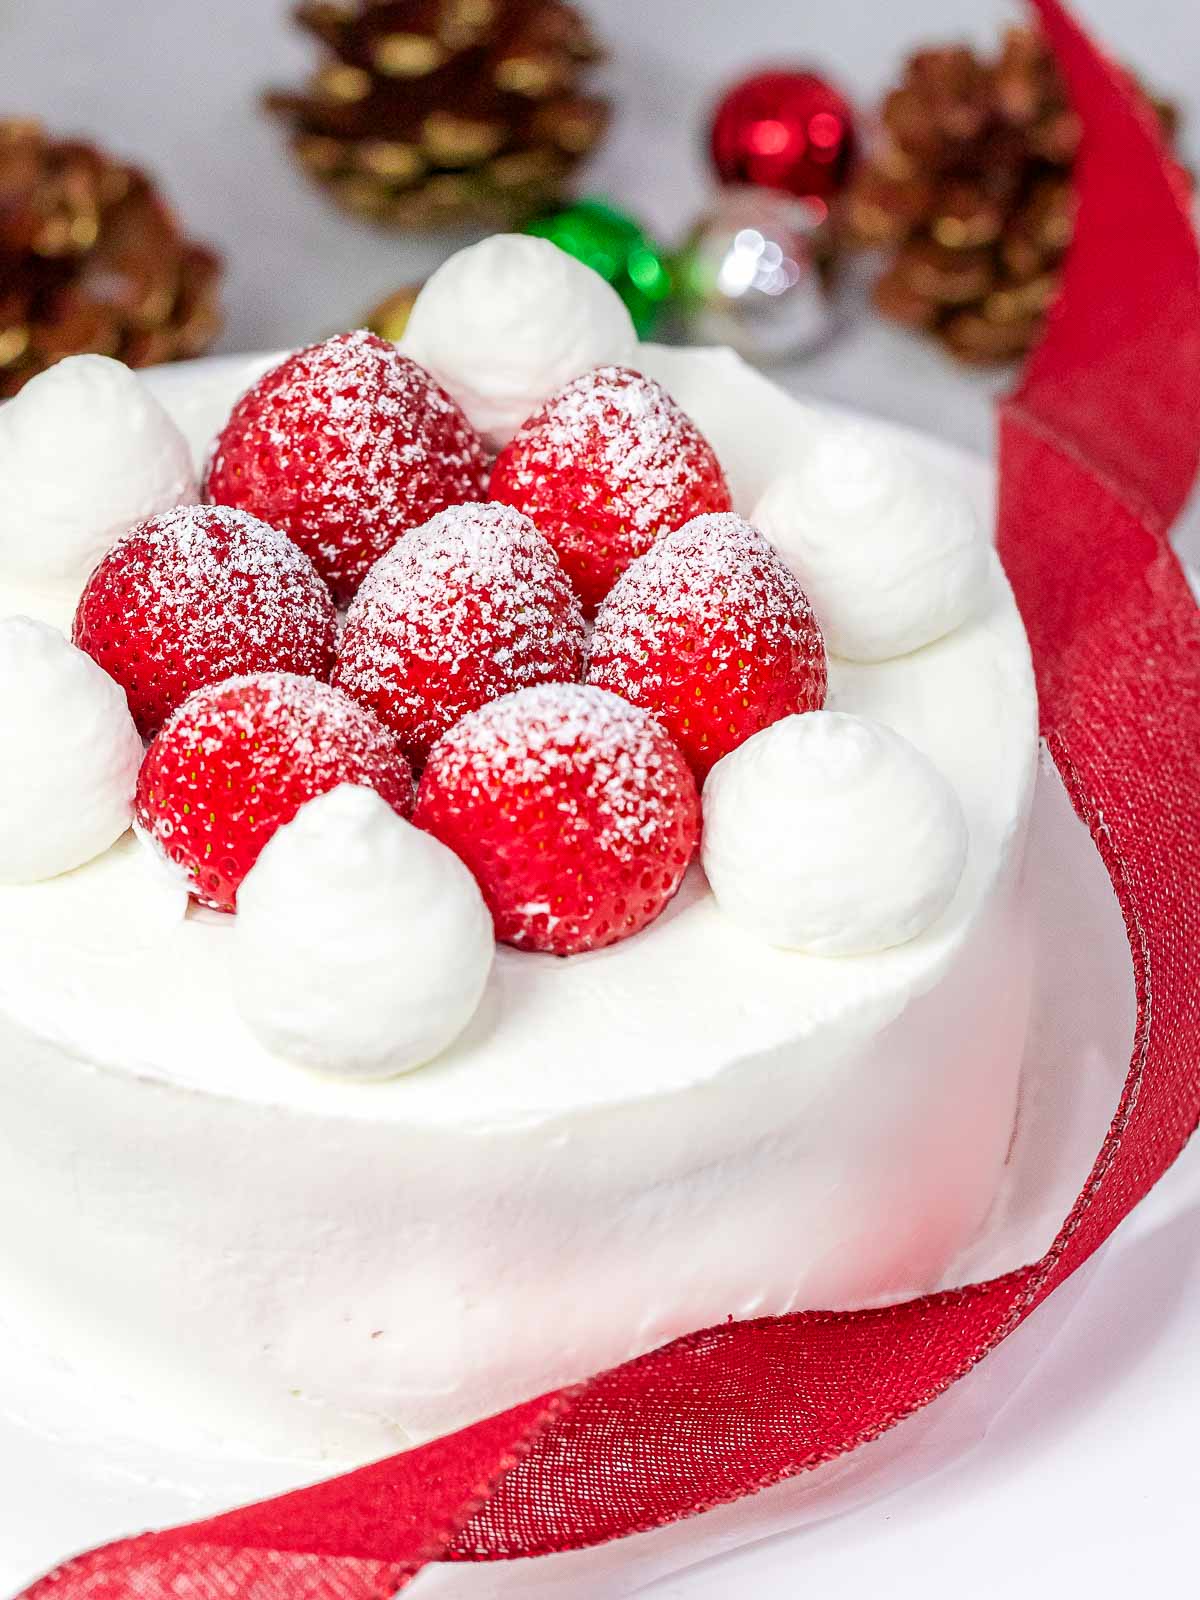
Japanese strawberry sponge cake is an extremely popular cake during Christmas and is appropriately called Japanese Christmas cake or kurisumasu keki (クリスマスケーキ). The red strawberries and white whipped cream resemble the red and white colors of Christmas and the powdered sugar resemble snow.
This is an excellent and easy Christmas cake to make for the holidays! This strawberry sponge is also very easy to decorate with just fresh cream and whole strawberries.
Why this recipe works
- The fresh strawberry sponge cake is extra fluffy and soft because the egg yolks and egg whites are beaten separately to add extra volume.
- Plain sponge cake can be made ahead and frozen. Simply thaw the cake sheets in the fridge before adding strawberries and whipped cream.
- Instead of butter, oil is added to this cake to add more moisture. Butter can contain up to 18% water which makes oil a better ingredient for this cake.
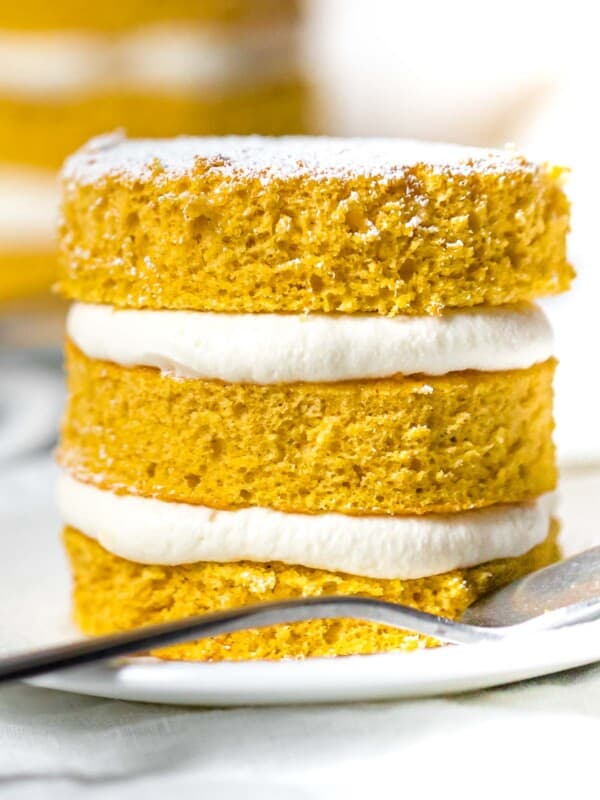
- You can change the fruit to make this a versatile base for any kind of flavored sponge cake!
- A lot of recipes for fresh strawberry cake call for strawberry puree in the batter, but I prefer keeping the strawberries fresh instead of cooking them. Cooking the strawberries in the cake causes it to lose some of its flavor. Fresh strawberries add the most flavor.
Ingredients you’ll need
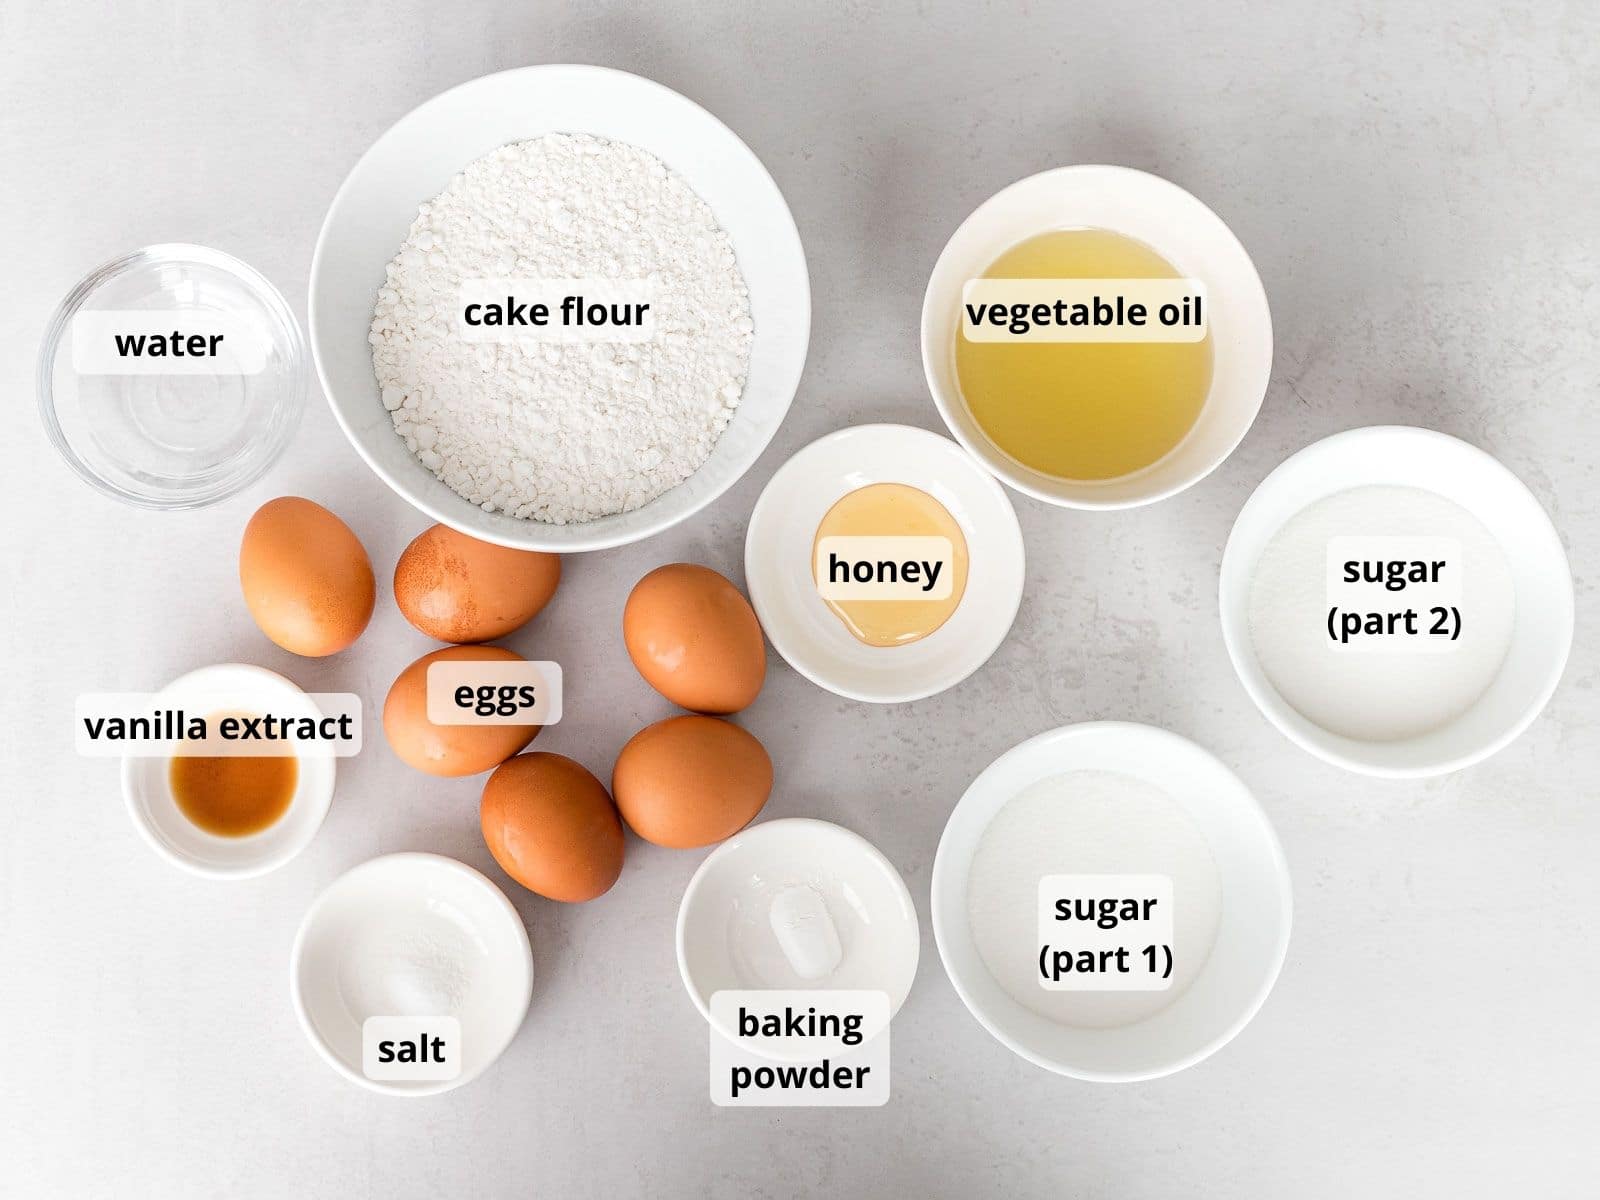
- Cake flour – avoid using all purpose flour; cake flour gives this a soft, fluffy texture
- Eggs – I used large eggs which weigh around 60 grams
- Vegetable oil – use a neutral oil such as avocado oil
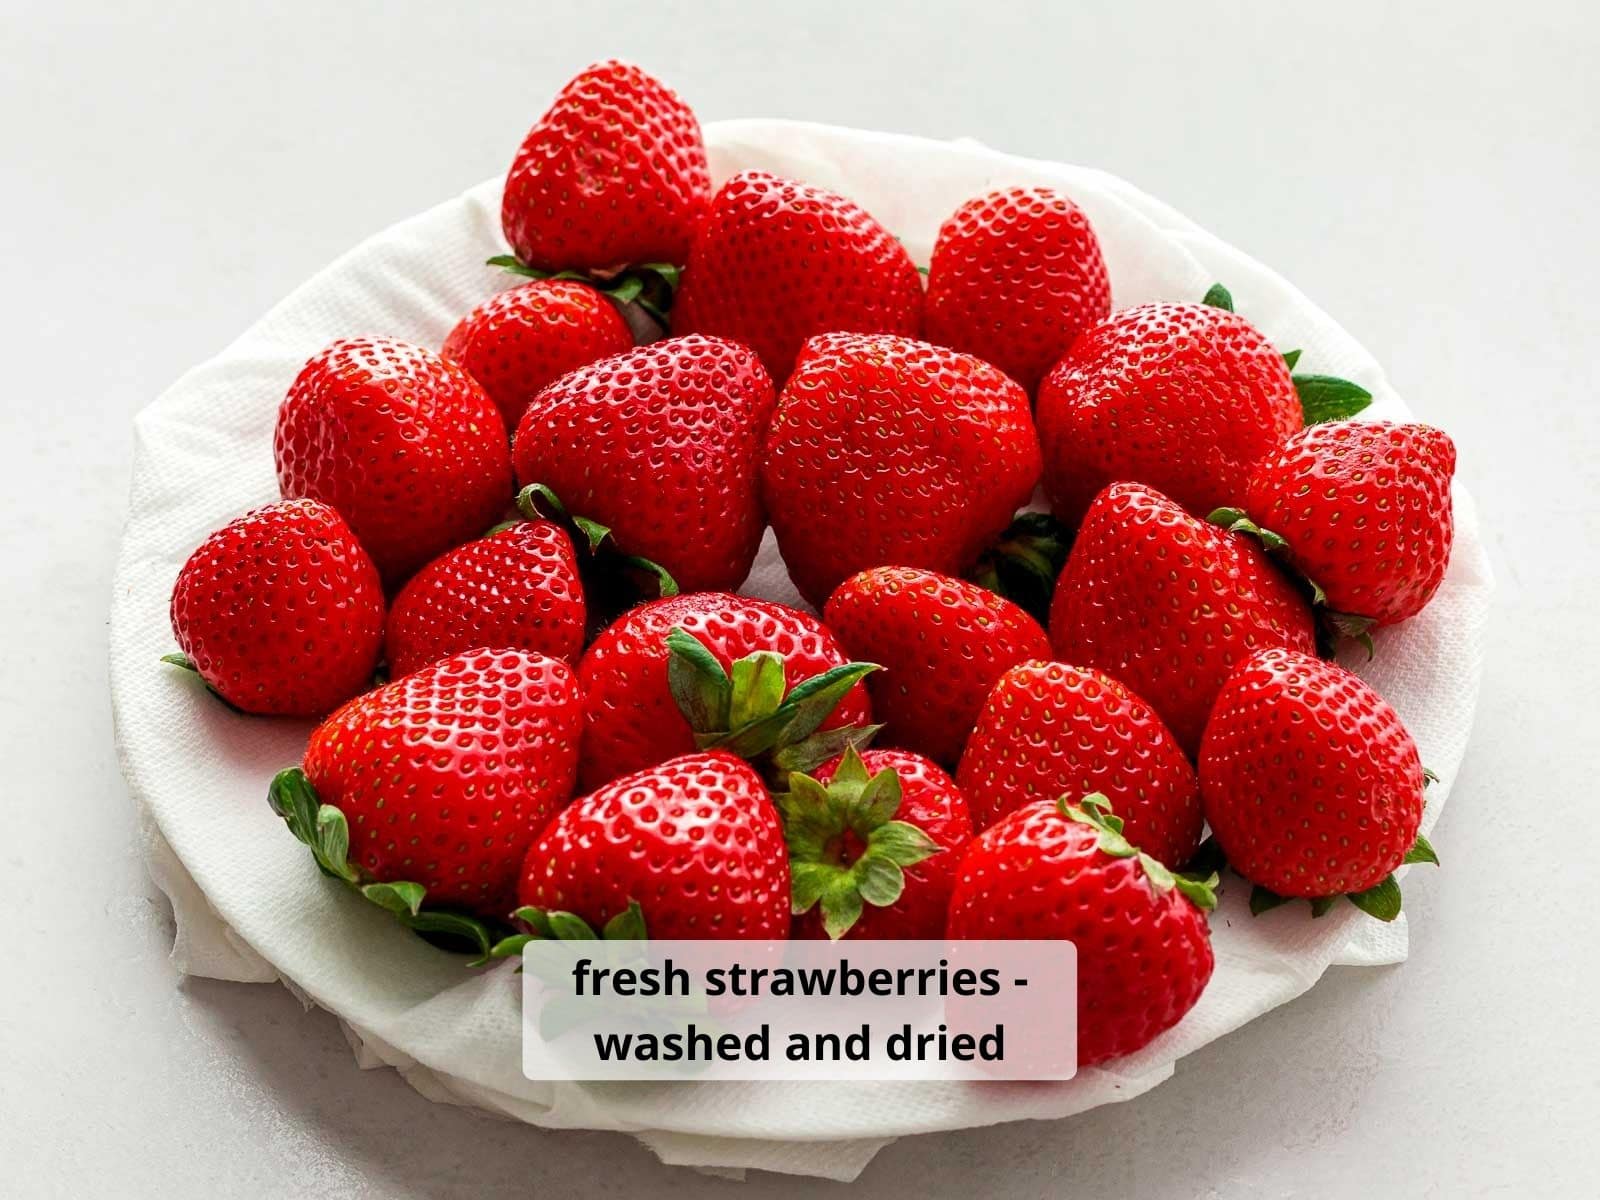
- Make sure to thoroughly dry the strawberries after washing them. This will help the strawberries stay fresh inside the cake layers.
Step by step instructions
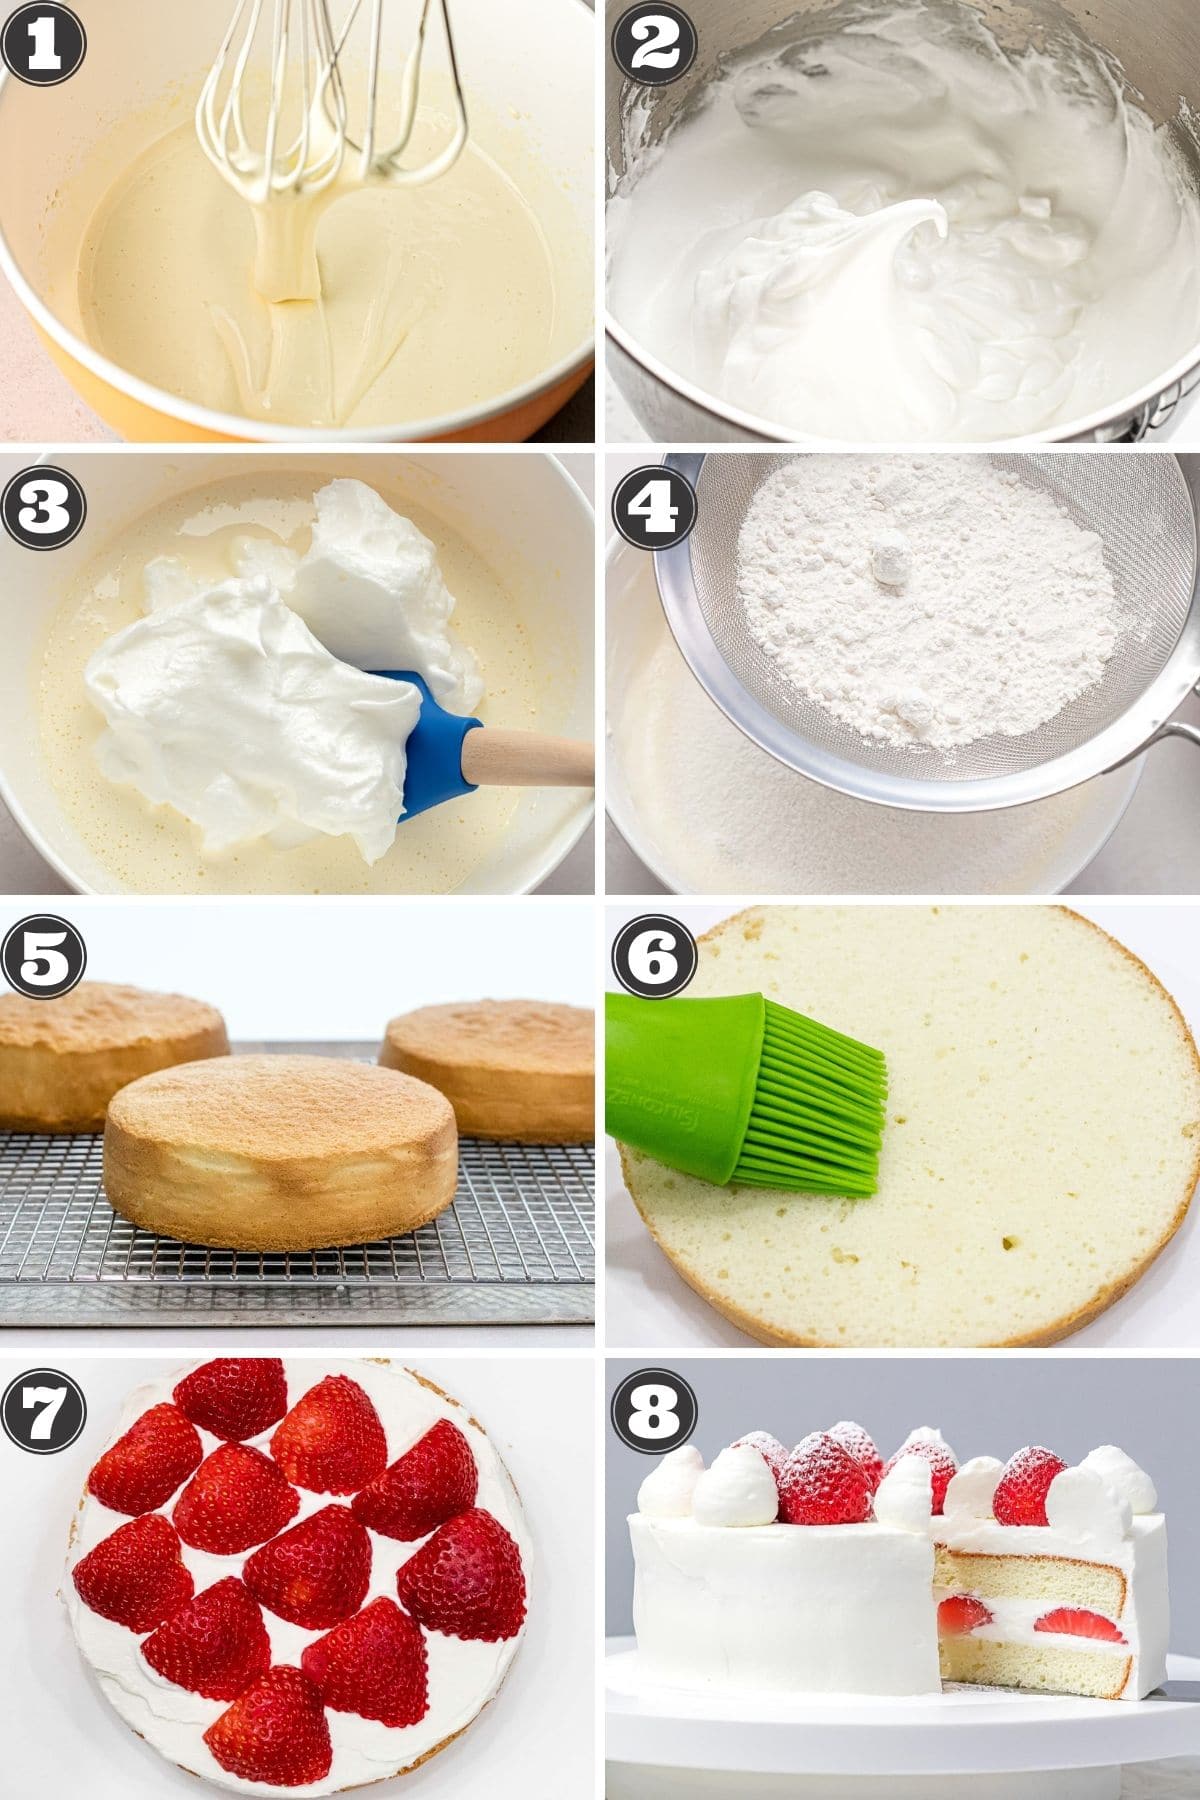
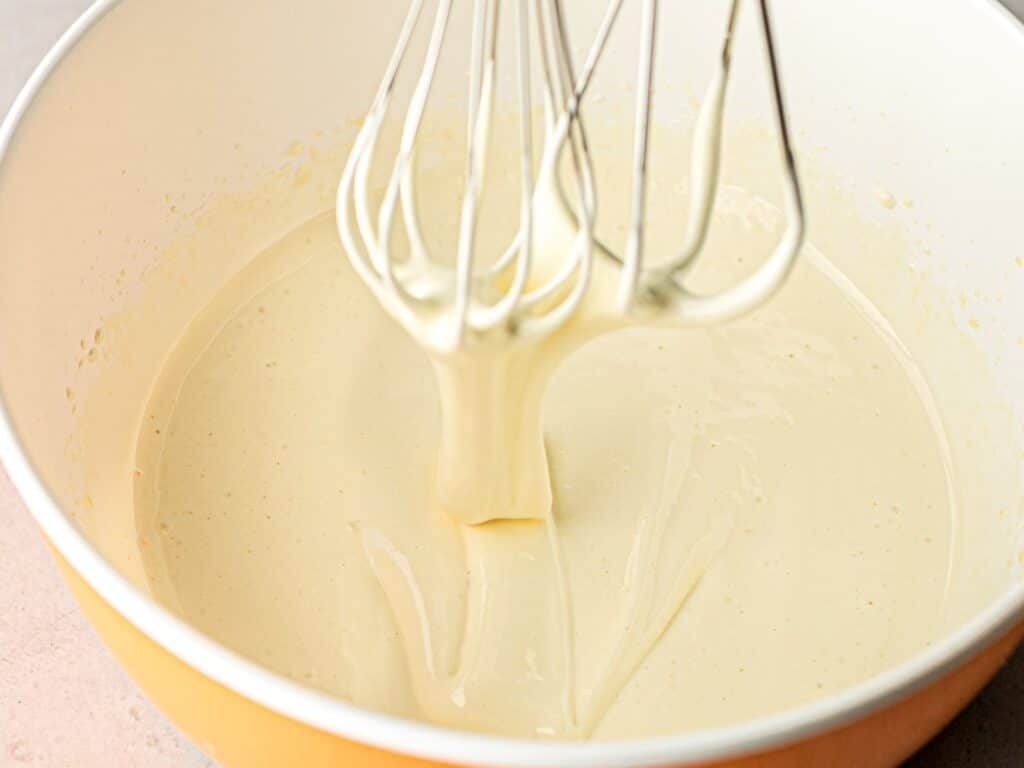
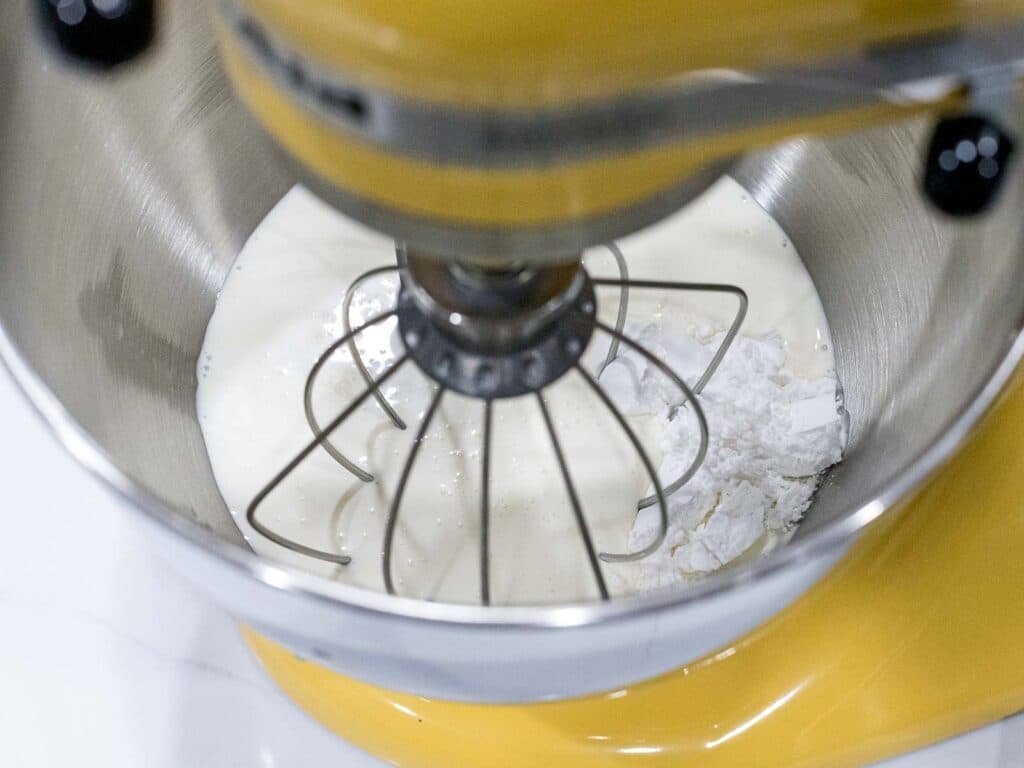
- Beat the egg yolks, sugar, salt, honey or corn syrup, vanilla, and water together until it becomes fluffy and a pale yellow color. The batter should form a ribbon when dropped from the whisk.
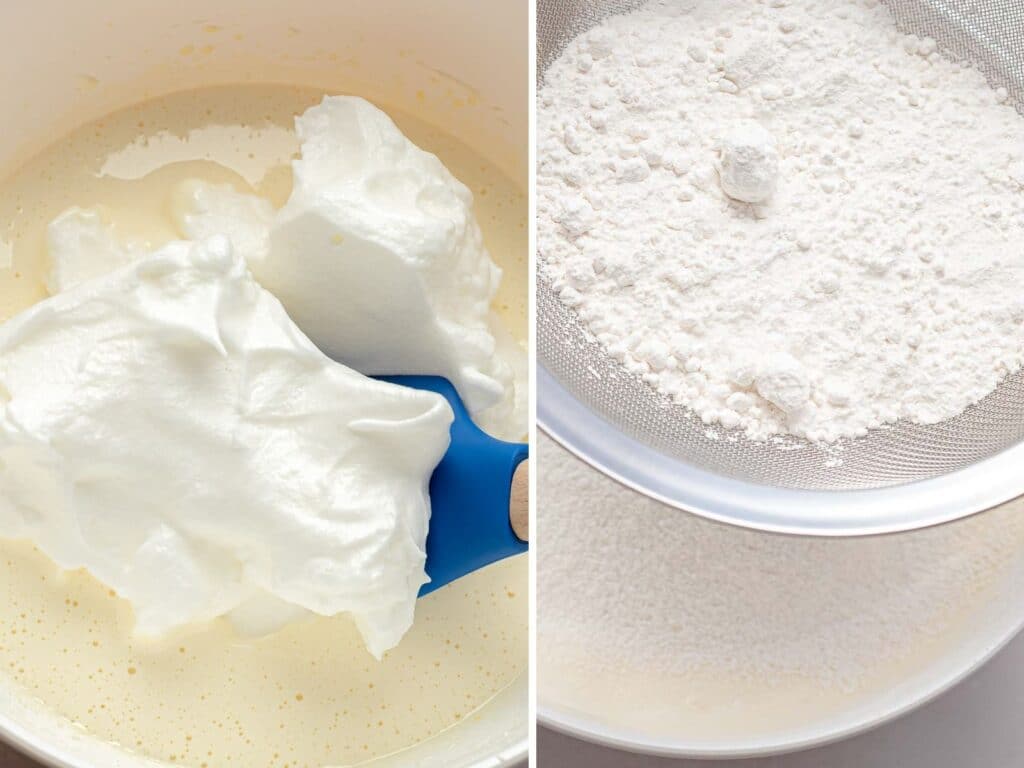
- The egg whites should be beaten to firm peaks, meaning the tips should fall but the meringue should hold its shape. Over beating the egg whites will result in a lumpy cake.
- Add half of the egg whites to the egg yolk mixture and gently fold it, being careful not to deflate the egg white meringue.
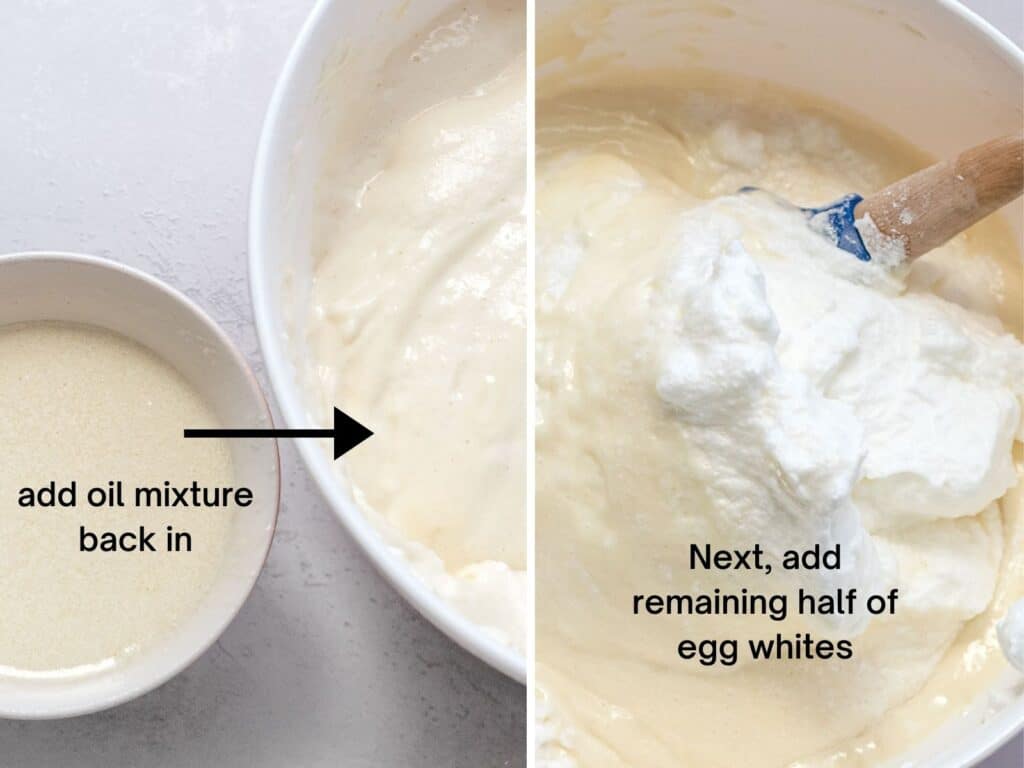
- Next, add the cake flour and baking powder to a fine mesh sieve and sift it into the egg white and egg yolk mixture. Add in the oil by first mixing it with 2 Tablespoons of the mixture and then gently fold in the remaining half of the egg white meringue.
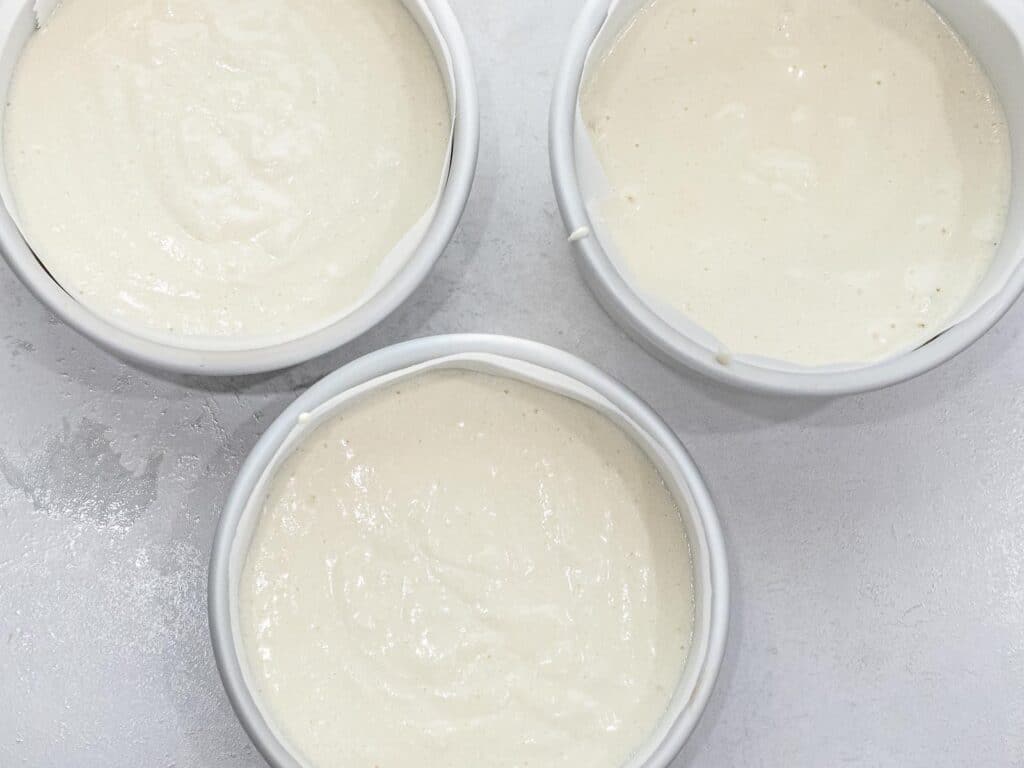
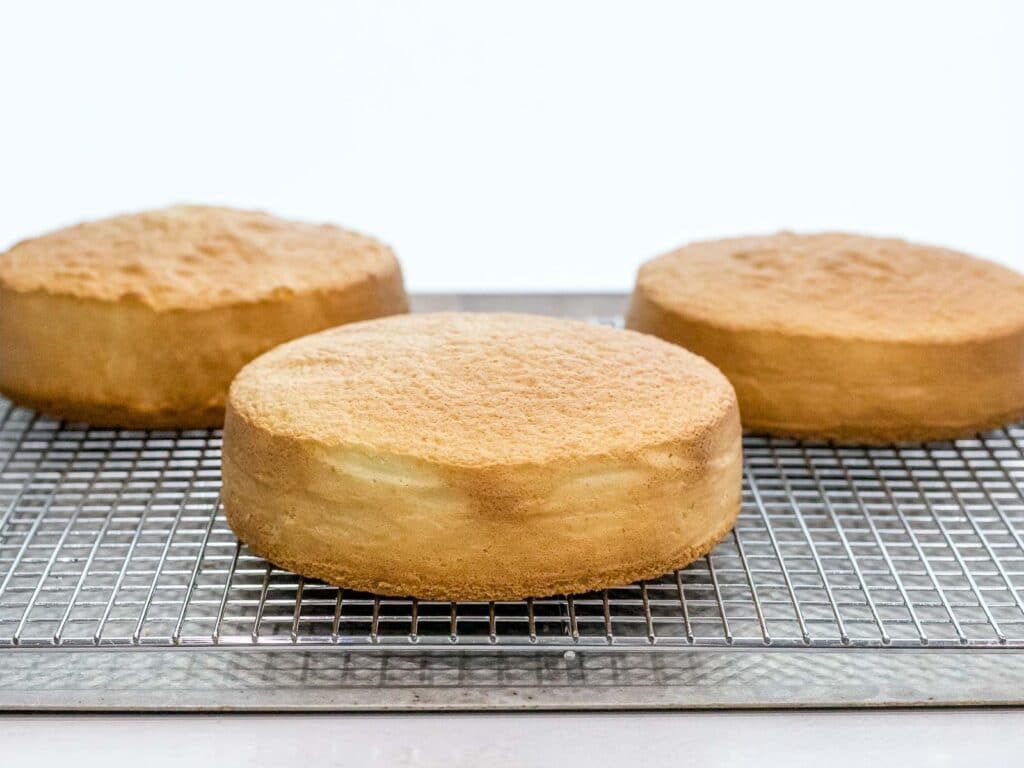
- Bake them at 350 degrees F in parchment lined cake pans until golden brown on top and a toothpick inserted comes out clean.
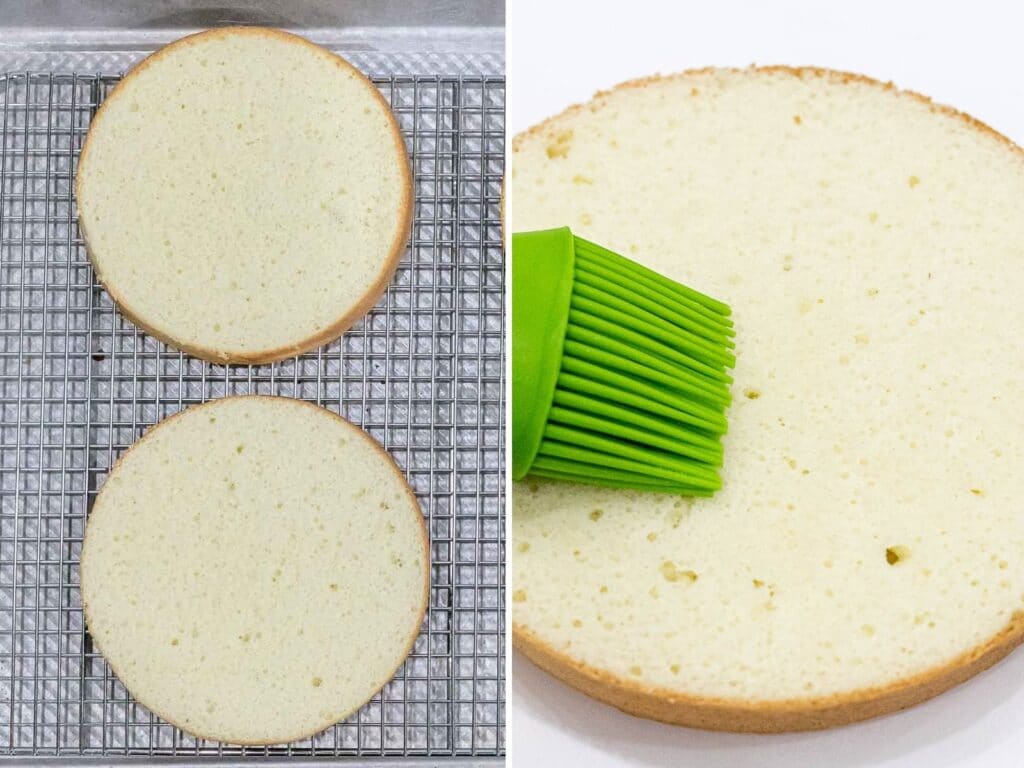
- Slice even layers and brush on the sugar syrup on all layers.
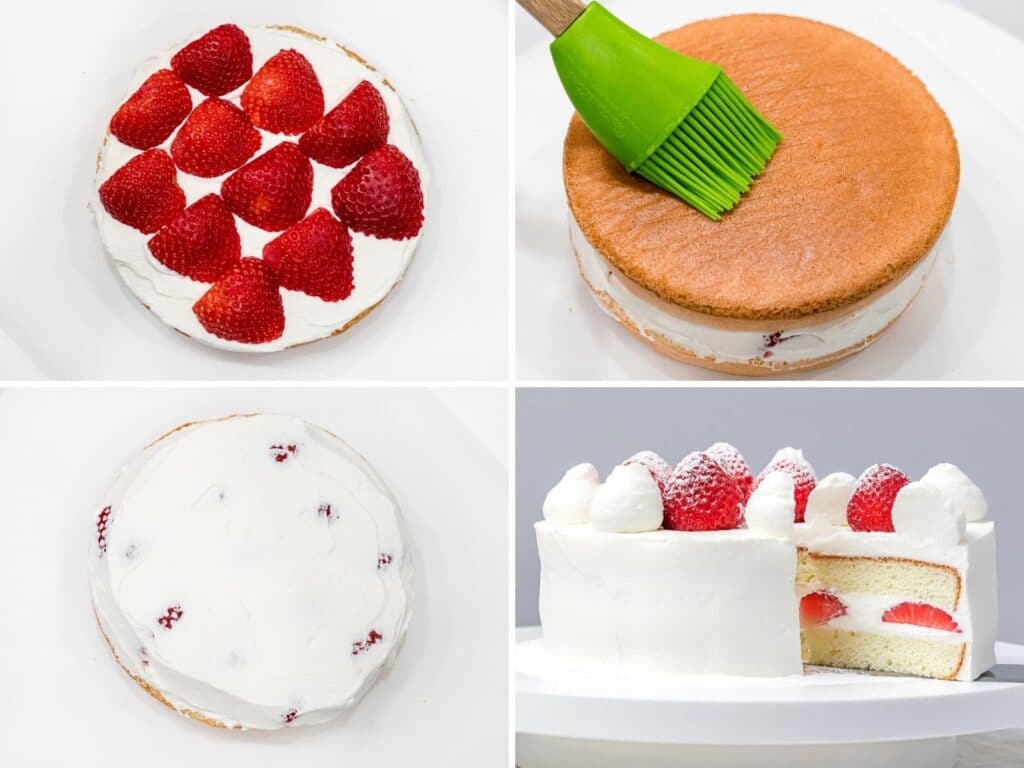
- Add the whipped cream then add the strawberry slices on top. Cover the strawberries with another layer of whipped cream and add on a sponge cake layer. Keep repeating until you’ve used up all your cake layers.
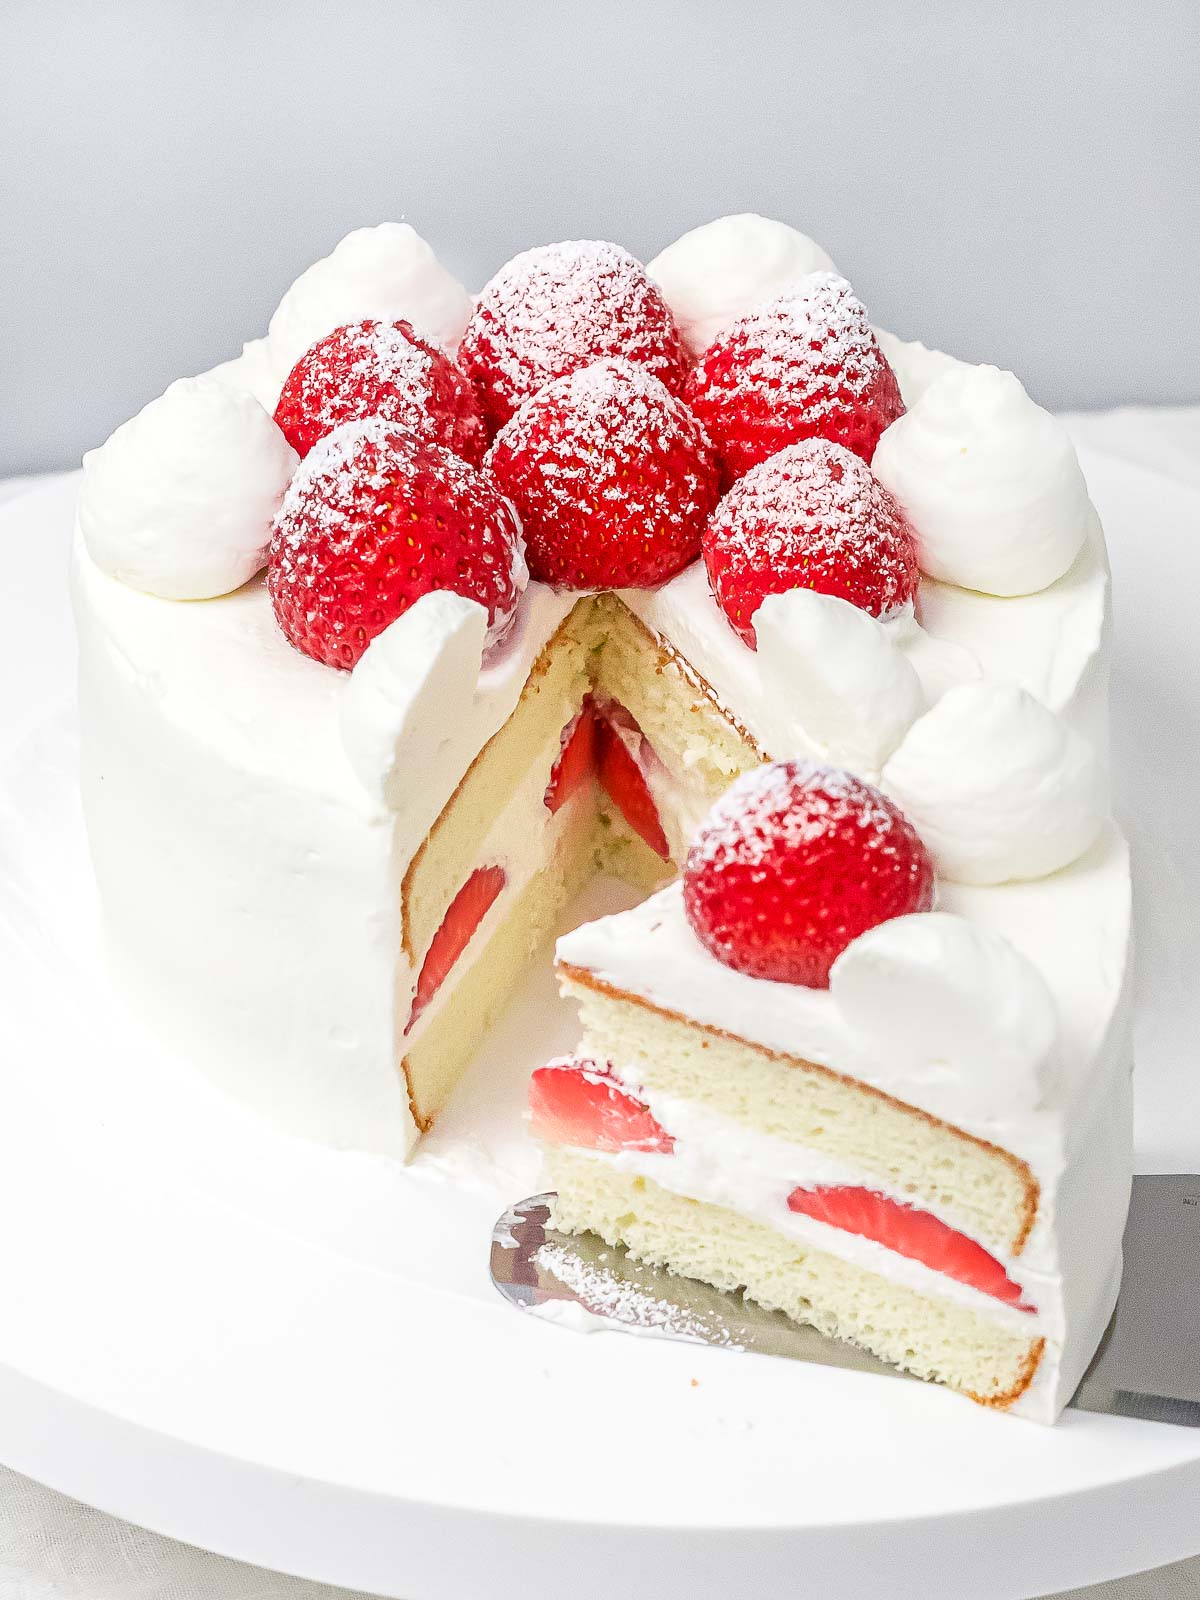
- Frost the top and sides of the cake with whipped cream and decorate with whole strawberries. Dust the top with powdered sugar if desired and serve immediately.
Expert tips & tricks
- Make sure your strawberries are thoroughly dried before adding them to the cake. This helps the strawberries stay fresh and keeps the cake from getting too soggy. It also prevents strawberry juice from bleeding out into the whipped cream.
- When combining the whipped egg yolks and egg whites, use a folding motion with your spatula while rotating the bowl.
- Be sure the sponge cake is completely cooled before slicing as this will help you get the smoothest, most even layers possible.
- Start with cold heavy cream. Whip the heavy cream on medium speed to get the smoothest, fluffiest whipped cream topping. Over whipping the cream will result in a grainy texture to the frosting.
Frequently Asked Questions
Japanese strawberry shortcake is made with a light, fluffy sponge cake as the base, whereas in the US, it’s made with biscuits or a more dense cake.
In the US version, shortcakes are halved and topped with macerated strawberries and whipped cream. The Japanese version is more similar to a fresh strawberry sponge cake that’s layered with whipped cream.
You can store this cake in the fridge for up to two days before the strawberries start to get soggy.
If you need to make this ahead of time, I recommend making the sponge cake and freezing in an airtight container it until it’s ready to decorate. Let the sponge cake thaw in the fridge or at room temperature and be sure it’s completely thawed before applying any whipped cream.
Japanese Christmas cake, also called kurisumasu keki (クリスマスケーキ) is typically eaten on Christmas Eve with friends and family. It’s called a Christmas cake because it’s decorated with strawberries and whipped cream to resemble the red and white colors of Christmas.
More dessert recipes:


Japanese Strawberry Shortcake | Japanese Christmas Cake
Ingredients
- 8 oz strawberries, washed and dried
Dry Ingredients:
- ½ cup cake flour , (65g) sifted
- ¼ cup white sugar , (44g) for egg yolks
- 2 ½ Tablespoons white sugar , (37g) for egg whites
- ¼ teaspoon baking powder
- ⅛ teaspoon salt, (½ g)
Wet Ingredients:
- 3 large eggs , whites and yolks separated
- 2 ½ Tablespoons avocado oil, (31g) substitute with neutral vegetable oil
- 1 Tablespoon water, (12g)
- 1 teaspoon corn syrup, (6g) substitute with honey
- ¼ teaspoon vanilla bean paste or vanilla extract
Whipped cream frosting:
- 2 cups heavy whipping cream, – should be cold
- 6 to 8 Tablespoons powdered sugar, – add more or less depending on taste
Cake syrup:
- 3 Tablespoons sugar
- ⅓ cup hot water
Instructions
Egg Yolk Mixture:
- Preheat oven to 350 degrees F. In a medium bowl, add together egg yolks, ¼ cup of sugar, salt, corn syrup, vanilla, and water. Beat on high with a stand mixer or hand mixer until fluffy and pale yellow with ribbons form when lifting the whisk. Set aside.

Egg White Meringue:
- In a large bowl, add the egg whites and beat on high until it starts to get foamy. Start adding the 2½ tablespoons of sugar in three equal parts, beating each time to incorporate. Beat the egg whites on high until firm peaks form. When lifting the whisk from the bowl, the meringue should hold its shape while the tip drops slightly.

Batter:
- Add ½ of the egg white meringue to the egg yolk mixture and gently fold it in until it's mostly mixed in. This should be light and airy. Next, sift the flour and baking powder into the yolk and meringue mixture in three equal parts, gently folding after each time.
- Take out 2 Tablespoons of the combined batter from the previous step and mix this with the oil until it's not longer separated. Gently fold the oil mixture into the batter. Next, add the remaining half of the egg white meringue by gently folding it in.
Bake:
- Pour the batter into a round cake pan lined with parchment paper. You can use one 8 inch pan or two 6 inch pans. Bang the pan twice on a flat surface to remove large air bubbles. Bake at 350 degrees F until golden brown and a toothpick inserted in the center comes out clean. About 15 minutes for two 6 inch pans or 23 to 25 minutes for one 8 inch pan.
- Remove the cake from the pan and remove the parchment paper. Let it cool on a cooling rack.
Slice and Decorate:
- Add the cold heavy cream and powdered sugar into a large mixing bowl and beat it on medium speed until you get medium peaks. Watch it carefully and stop the mixer before it becomes grainy. See Note 2.
- Slice the cake into even layers. See Note 3 for how to slice even layers. Make the sugar syrup by dissolving the sugar in the hot water. Then, brush on even amounts of the sugar syrup onto all the layers, including the top layer.Cut half of the strawberries into thick slices for the inner layer. Leave the other half whole to decorate the top of the cake.
- Apply a layer of cream to the cake sheet and then top it with sliced strawberries. Add another layer of cream on top of the strawberries and followed by another layer of cake. Repeat as necessary. Next, frost the top and sides of the cake with whipped cream and decorate as desired. Place whole strawberries on top of the cake, sprinkled with powdered sugar. Serve immediately.
Notes
- You can use one 8 inch cake pan or two 6 inch cake pans. Avoid using nonstick pans as the coating prevents the sponge cake from fully rising.
- Medium peaks – the whipped cream should be soft but hold its shape when the whisk is lifted from the bowl. The top of the peak should fall over but the body will retain its shape. The texture should be smooth with no graininess. Whipping too much will result in a grainy, lumpy texture and you may start to see cracks in the cream which indicate separation.
- Slice even layers: First, you want to use a sharp, serrated knife. Next, I prefer to use this cake slicer attachment that works well. Otherwise, you can use toothpicks to mark where you want to cut the layers. Pierce the toothpicks all around the cake and use that as a guide for your knife. Avoid using wire cutter cake levelers as the sponge cake too soft for that tool.
Nutrition
Nutrition information is automatically calculated, so should only be used as an approximation.
Like this? Leave a comment below!


Hi! If I want to bake this in a 2 layer 9×13 cake, should I double the recipe and slice the cake in half? Or should I quadruple the recipe and bake in 2 batches?
Hi Allie! Yes, you can double the recipe and bake it in a 9×13 cake pan, then cut the cake sheet in half to have two layers. You’ll end up with a cake that’s half that size since you’re doubling the layer if you’re okay with that. Click on the “2x” button above the ingredients to double the measurements. Hope that helps! 🙂
The texture of this is superb! I would rate it 10 stars if I could!
Folding in the egg whites really does make all of the difference. Every cake recipe of yours that I have tried has just been SO good!
Thank you! 🙂
Thank you so much Kelli! That makes me so happy to hear!
I’ve made the cake it was wonderful, but was wondering if I could make it with cupcakes and fill with fresh strawberries?
Yes absolutely! That sounds delicious! 🙂
I made the cake and it was wonderful, can you make cupcakes with this recipe?
Thank you Tina! I can’t see why not. Please be sure to use a cupcake liner so the sponge cake has something to hold onto while it rises.
Is it OK if I use all-purpose flour or a cake flour substitute with all-purpose flour (probably a combination of all-purpose flour and cornstarch) for actual cake flour for this recipe?
Hi Theresa, I haven’t tried that myself so can’t say for sure. If you try it, please let me know how it turns out. 🙂
Hi! I am very eager to try this recipe! I have a question though! Will it mess up the light and fluffiness of the cake if I substitute the oil for melted butter?
Hi Rachel, I haven’t tried this recipe with melted butter so can’t say for sure. But if I have a recipe for genoise cake that uses melted butter if you’d like to try that.
Can the whipped cream hold up in the fridge a night before its needed without deflating ?
Hi Nashana, I’d recommend stabilized whipped cream for this. It holds its shape and doesn’t weep like regular whipped cream.
This strawberry shortcake looks amazing! Will be perfect for the summer months with delicious summer strawberries.
This cake was so delightfully fluffy. The best compliment one can give is it was not too sweet, Asian sweet. This recipe is definitely a keeper! I’ve been trying different recipes and they’ve been too dry, too dense, need a tube pan. This one worked perfectly in my 8 inch aluminum pan. I love that it did not sink in the middle. My kid wants this strawberry cake for his 7th birthday. Thank you!!!
Thank you Annie! I’m so glad you and your family enjoyed this Japanese strawberry shortcake!
This cake was delicious! The sponge cake was so soft and fluffy.
This cake was so delicious! I’ve tried a few of these Japanese cakes, but this is so far the best! I love it so much and the sponge cake is so soft and fluffy. Thanks so much for this recipe!
Thank you Julie! That’s so great to hear! 🙂
Hello! Thank you for your recipe! Just a question please – If making two 6 inch cakes, do I stack the two cakes to make 1 cake or cut the 2 cakes in half and make a single 4 layer cake or is it two 2 layer 6 inch cakes? Thank you!
Hi Jennifer! I made two 2-layer cakes with this recipe. So I sliced each cake in half to create 4 layers total.
Hi, beautiful and easy to follow recipe! I’m planning to make this for a friend’s birthday and made a trial attempt today. Towards the end of baking (baked at 175 deg C for 23min for 2 8″ pans) the cake started pulling from the sides of the tin, and this continued during cooling making the cake smaller. Is there anything I could do to ensure the sides are straight and don’t pull from the pan? E.g., would cake strips help to bake it more evenly?
Excited to try making this again!
Hi Aruzia, what kind of pan did you bake this in, and did you happen to use parchment paper? If you happened to bake this in a nonstick pan, that could have caused this. If you try with cake strips, please share your results. 🙂
How tall is the cake supposed to be if it’s baked in a 8 inch cake pan? I tried this recipe twice – and both times it baked to be a little over 1 inch in height. Your pictures show a much taller cake, but I’m wondering if it’s because those pictures show a 6 inch cake instead? I ask because I’m not sure if I’m underwhipping the egg whites each time and therefore not getting an appropriate height on the cake. Wonderful dessert though – not too sweet, light and airy!
Hi JC, when baked in a 6 inch pan, it was a little over 2 inches. You can try increasing the amounts for an 8 inch cake pan and see if that gets you the volume you’d like. Please share your results. 🙂
Hi, will this hold up to a four layer cake?
It depends on the filling but for anything over 3 layers, I would recommend using stabilized whipped cream and dowels.
this shortcake is so tasty !! pinned for later
my kind of cake! love how moist and sweet it turns out! so yummy!
Perfect for Christmas, so fluffy!